I often get questions about Exadata, running Oracle Database on Exadata, and running Oracle Database in general.
A more “general” database question I got recently—though it has an Exadata and Exascale basis—is, “How can an administrator prevent a standby database from being used in a switchover or failover event?”
Why would you prevent a standby from being used for its core purpose?
This needs more context. The background is that an organization plans to set up a primary database system and a DR system. They also have a nonprod (dev/test) environment in which they want production-like data to make development and testing more robust. They want to create multiple clones of a gold-image nonprod database so that, when they provide production-like data to developers, they can mask the data once and clone it many times.
They are interested in Exascale for its ability to create database clones efficiently and quickly.
So how does this all come together, and how does it relate to the question?
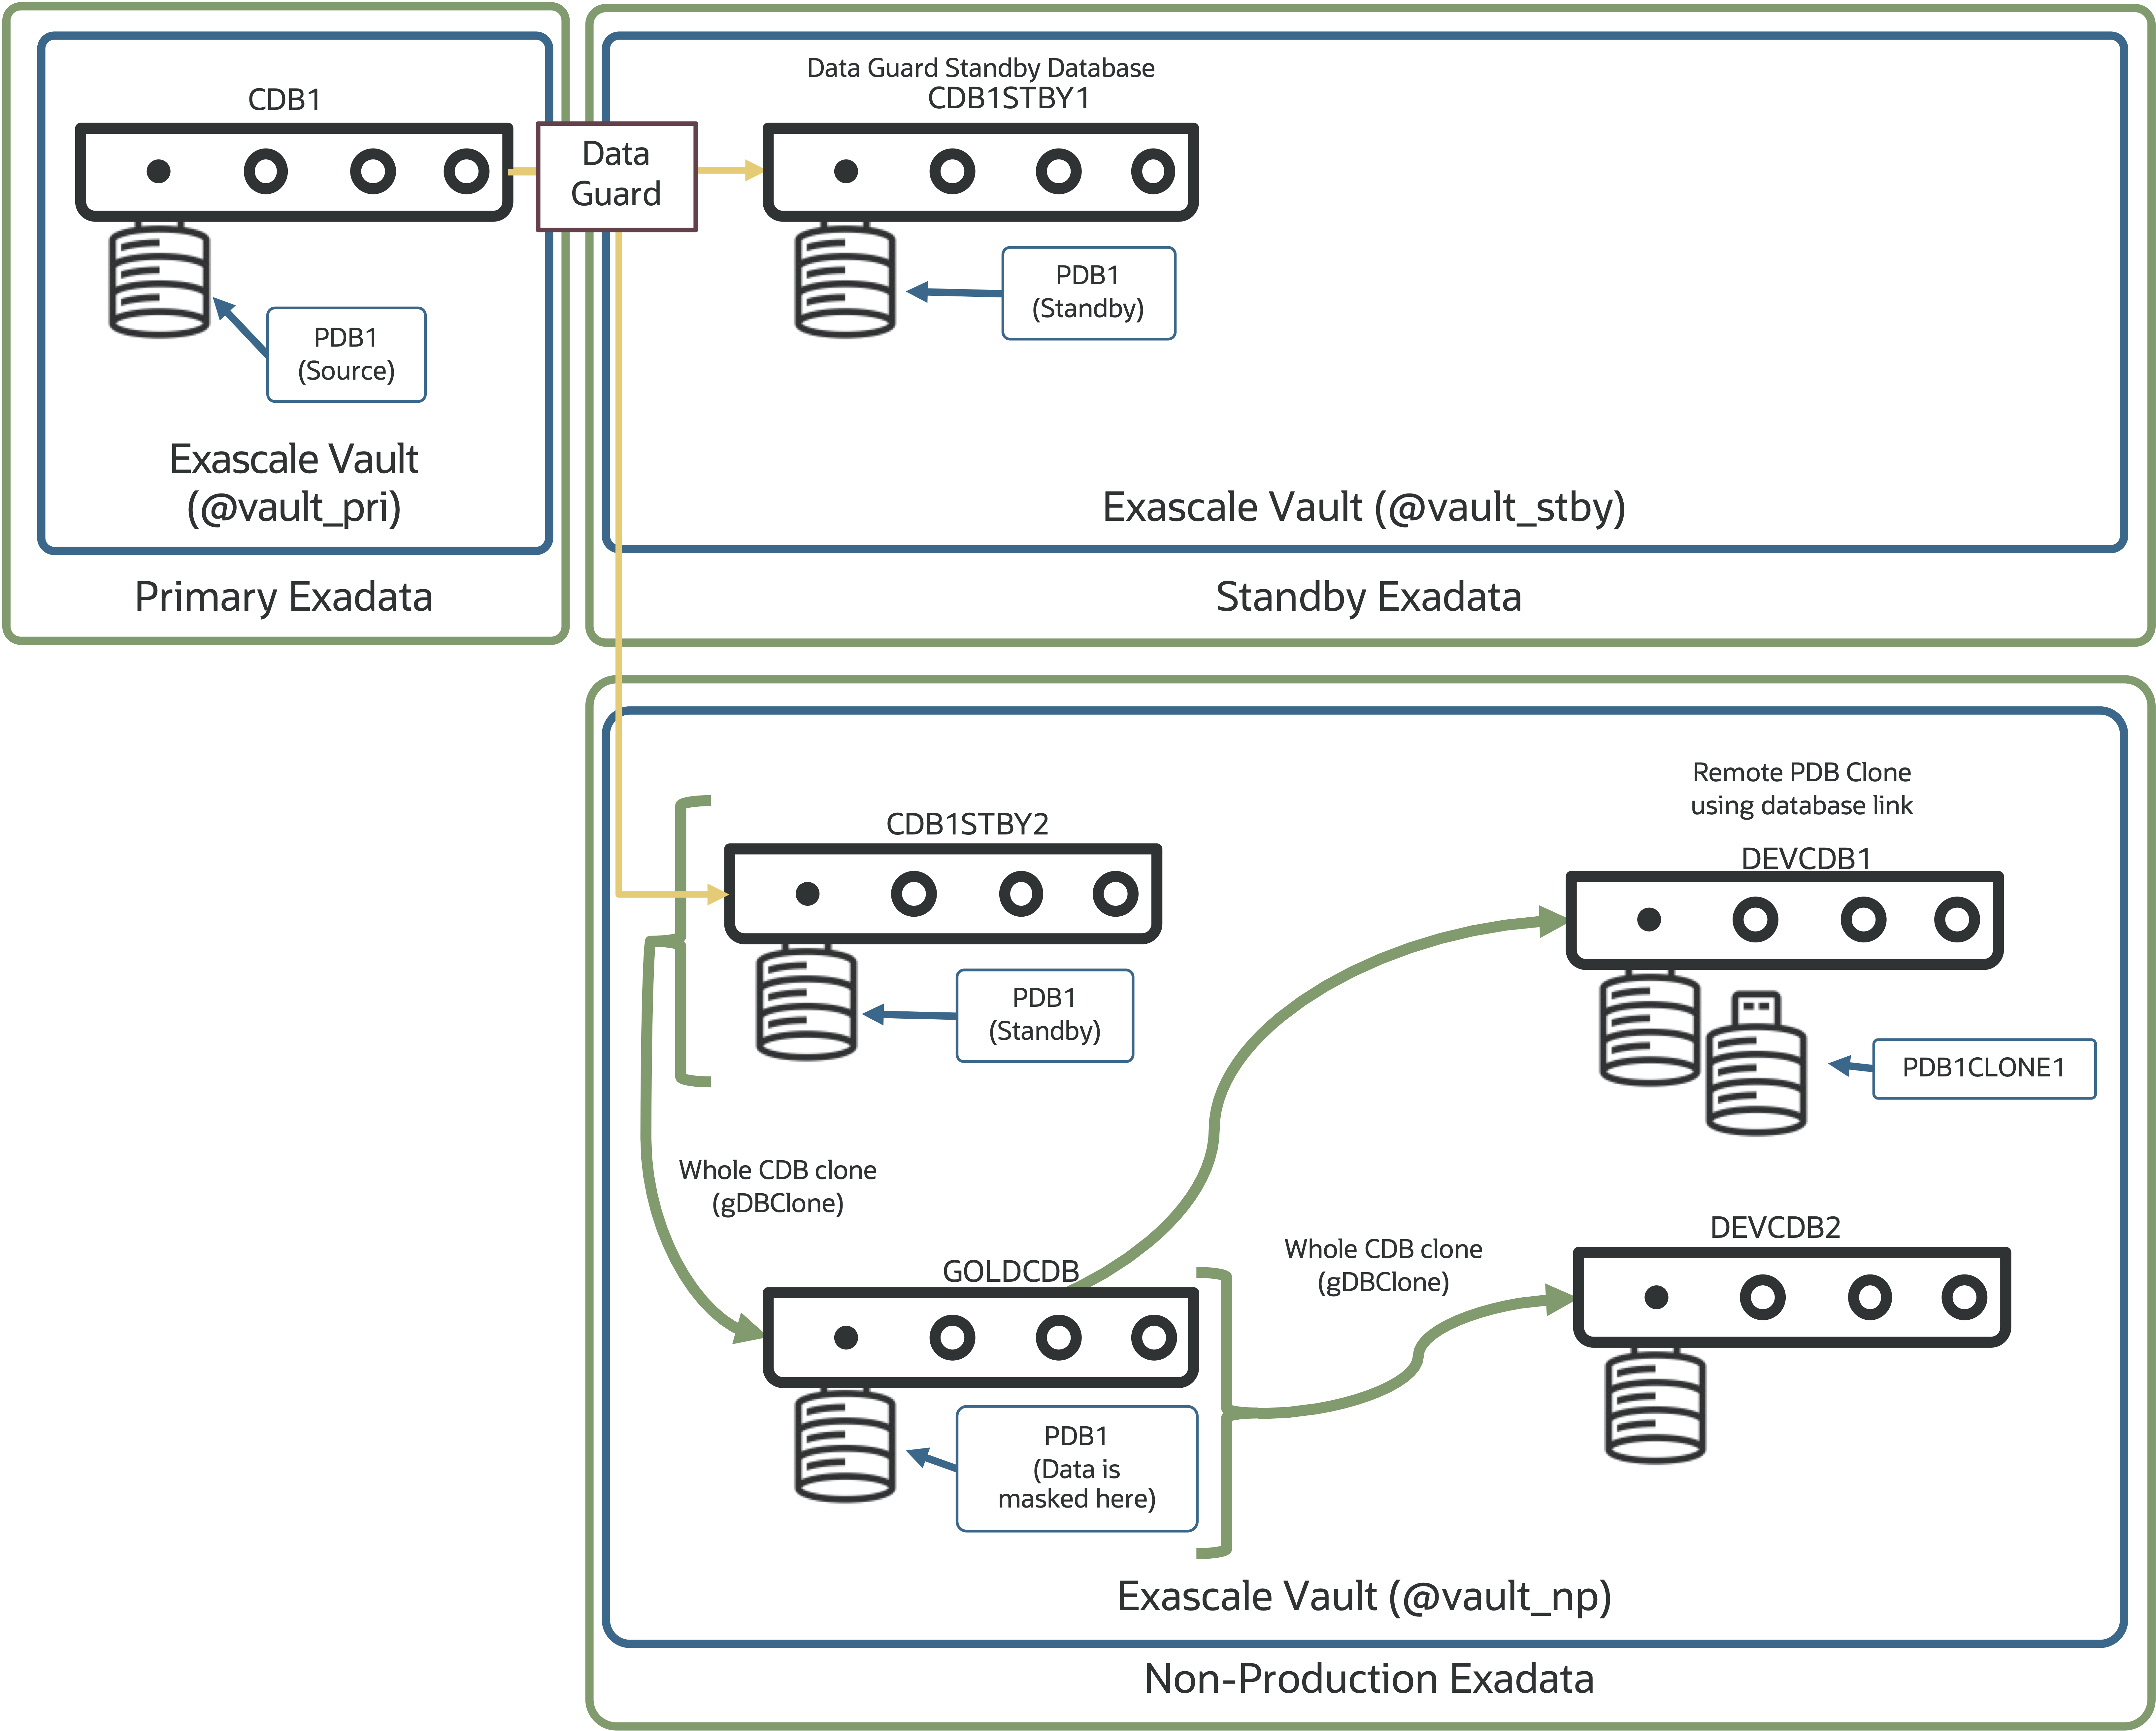
First, a Data Guard standby database can serve as the source for subsequent database clones on Exascale. Oracle recommends using a secondary standby database for this purpose, to separate the DR function from cloning. In other words, use at least two standby databases—one for DR and one as the source of your clones.
The second standby database is kept up to date by the primary, as with the DR database.
You can then create a clone from the second standby database and mask it with your favorite tool, such as Enterprise Manager, to create your gold‑image database.
Finally, you can create database clones using gDBClone at the CDB level, or run ‘CREATE PLUGGABLE DATABASE clonepdb FROM sourcepdb SNAPSHOT COPY;’ for PDB‑level clones on Exascale.
The resulting environment looks like this:
This brings us closer to the initial question: How can I prevent my secondary standby database (CDB1STBY2) from being used for DR?
Let’s come back to why this is even a question.
The secondary standby database (CDB1STBY2) is in a separate Exadata environment—likely in a different network zone and possibly on a system not sized for the production workload.
To prevent the secondary standby from being switched to or failed over, Data Guard Broker (starting with 19.26 and 26ai) lets you specify which databases can assume the primary role using the “PrimaryDatabaseCandidates” property. Any databases in the configuration not listed in this property cannot be switched to or failed over using Data Guard Broker.
If we try to switch over or fail over to CDB1STBY2 now, Data Guard Broker will prevent the operation because we told it not to allow this database to become the primary.
DGMGRL> switchover to CDB1STBY2;
2026-01-12T15:16:23.812-07:00
Performing switchover NOW, please wait...

Error: ORA-16529: Switchover and failover operations are restricted to databases specified in the PrimaryDatabaseCandidates configuration property.

Failed.
2026-01-12T15:16:23.954-07:00
Unable to switchover, primary database is still "CDB1"
And that’s it – using Data Guard Broker to prevent specific standby databases from becoming a primary database is easy, and for environments
If you take one thing away, make it this: keep two standbys—one for DR, one for clones.
If you take two things away, the second is that Data Guard Broker can help ensure only the databases you want to allow to become primary can take on that responsibility.
A quick shout out to Ludovico Caldera who pointed me in the direction of this useful feature in Data Guard Broker.
Sometimes its the little things that annoy me the most. OK, maybe its more often than sometimes.
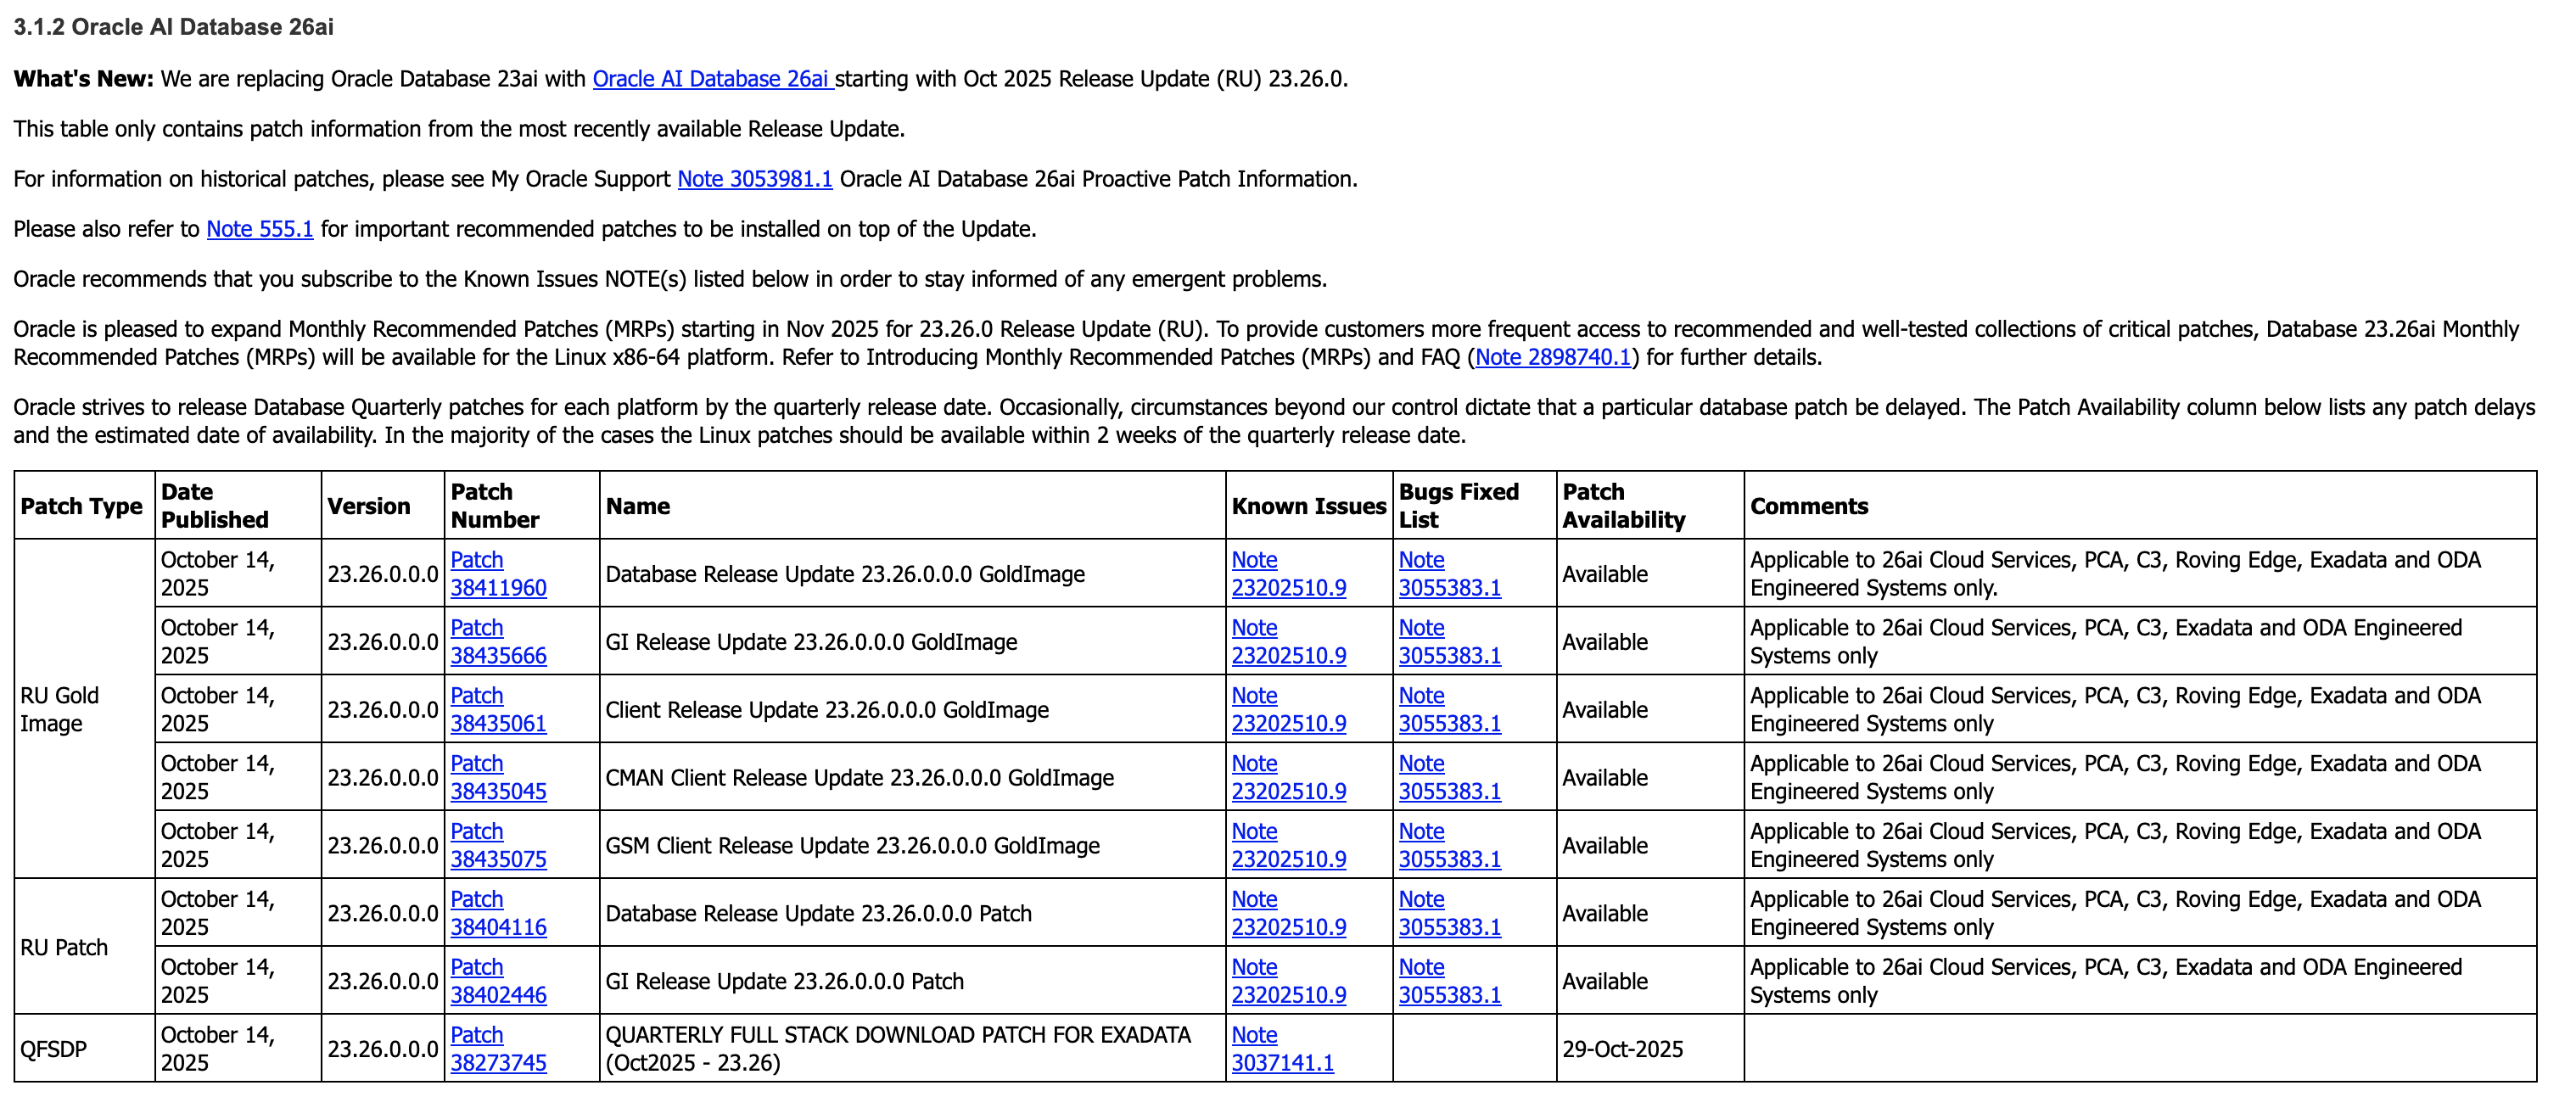
In today’s episode of annoying things, I was looking for the latest Oracle database and grid infrastructure gold images for Exadata so I can update my databases to Oracle AI Database 26ai (more on that in another post).
As always, I go to the following MOS notes – 888828.1, and 888.1 – to get the desired information.
Which give me the specific patches I need to download. (888828.1 first, followed by 888.1)
But here’s the thing – I want the Database and GI Gold Image Clone files for Exadata so I can use them with OEDACLI to install and update my VM clusters.
In MOS, to find these you can search for “DB SOFTWARE CLONE” or “‘GI SOFTWARE CLONE” and do some digging to find what you’re looking for.
But the easiest option to find this information is to use OEDA itself.
Then unzip it to a location of your choosing, fire up the Web UI and walk through creating a configuration, or upload and update an existing configuration, which will give you the desired information in the installation report at the end!
Simple right. Sure – but its actually even easier than this.
OEDACLI has a great little feature which gives you this same information, namely the patches you need to download, in two simple commands.
Again, after downloading the latest OEDA release, start oedacli from the command line. You don’t need to provide a configuration file.
./oedacli
Then, use the ‘list requiredfiles’ command and pass in the DB or GI versions you want information about.
So for the DB, I want to grab patch 38455285, and for GI I want patch 38455288.
So what was annoying me about that? My own memory! This neat feature has been around since the around 2017 (if not earlier), but somewhere along the way I forgot about it and started doing things the hard way again…
Oh, and while we still have oedacli running, if you want to know what software versions are supported on your generation of Exadata, the LIST SOFTWAREVERSIONS command is really helpful.
oedacli> list softwareversions where type=X8M
GI Versions for X8M
11.2.0.4.210119
12.1.0.2.220719
12.2.0.1.220118
18.14.0.0.210420
19.29.0.0.251021, 19.28.0.0.250715, 19.27.0.0.250415, 19.26.0.0.250121
23.26.0.0.0, 23.9.0.25.07, 23.8.0.25.04, 23.7.0.25.01
Recommended GI version: 23.26.0.0.0

DB Versions for X8M
11.2.0.4.210119
12.1.0.2.220719
12.2.0.1.220118
18.14.0.0.210420
19.29.0.0.251021, 19.28.0.0.250715, 19.27.0.0.250415, 19.26.0.0.250121
23.26.0.0.0, 23.9.0.25.07, 23.8.0.25.04, 23.7.0.25.01
Recommended DB version: 23.26.0.0.0
Make sure you have the appropriate support in place for any versions earlier than 19c.
And that’s it – the easiest way to get the patch numbers for the Gold Image Clones used by OEDA and Exadata to deploy and update Oracle Database and Grid Infrastructure!
Want to see how quick it is to create a clone of an Oracle 23ai PDB on Exadata Exascale?
First a little background information.
I have a “simple” database in the example, with a PDB – named DEMOPDB1.
show pdbs

SQL> show pdbs

   CON_ID CON_NAME    OPEN MODE     RESTRICTED
_________ ___________ _____________ _____________
        2 PDB$SEED    READ ONLY     NO
        3 PDB1        READ WRITE    NO
        4 DEMOPDB1    READ WRITE    NO
It’s approximately 2.4 TB in size (temp excluded).
SQL> select p.name, sum(f.bytes)/1024/1024/1024 as total_gb
  2  from v$pdbs p, v$datafile f
  3  where p.con_id = f.con_id
  4* group by p.name;

NAME                        TOTAL_GB
___________ ________________________
PDB$SEED          10.625396728515625
PDB1              14.718536376953125
DEMOPDB1       2403.8817901611328125
To create a clone of this PDB on Exascale, all we need to do is
SQL> set timing on; <- so you can see how fast it is

SQL> create pluggable database demopdb2 from demopdb1 snapshot copy;

Pluggable database DEMOPDB2 created.

Elapsed: 00:00:11.105 <- ~2.4 TB in under 12 seconds!!
The keywords ‘SNAPSHOT COPY’ are important here. They’re instructing the database to use the space-efficient, thin-provisioned, redirect-on-write capabilities of Exascale to create
Then, we’ll open it up.
SQL> alter pluggable database DEMOPDB2 open instances=all;

Pluggable database DEMOPDB2 altered.

Elapsed: 00:00:10.897 <- opening the PDB on 2 instances in this case
Check the size of the new PDB – spoiler alert, its the same size as the PDB I was cloning!
SQL> select p.name, sum(f.bytes)/1024/1024/1024 as total_gb
  2  from v$pdbs p, v$datafile f
  3  where p.con_id = f.con_id
  4* group by p.name;

NAME                        TOTAL_GB
___________ ________________________
PDB$SEED          10.625396728515625
PDB1              14.718536376953125
DEMOPDB1       2403.8817901611328125
DEMOPDB2       2403.8817901611328125 <- new PDB!
And that’s it – less than 30 seconds and you have a thin clone of a PDB.
I was recently playing with the new AI Vector Search capabilities of Database 23ai, when I did something a little daft.
Without really thinking about what I was doing, I increased the memory allocated to vector_memory_size. “Ok” you say, “Whats wrong with that?” At face value nothing, I changed a parameter. But as I didn’t think about the any of the other memory parameters, like sga_max_size and sga_max_target, I set myself up for an inevitable problem if I restarted the database, or the VMs I was using were restarted.
And restart the database (and the VMs) I did – or tried.
And restart the database did not.
Without worrying about how I messed up, lets cover how I got out of this pickle.
First, as the title indicates, I’m working on an Exadata that has been deployed with the awesome (if I do say so myself) Exascale technology. You can check out more about Exascale on the Exadata PM blog. For now, know that at its core is a new decoupled storage management system that manages storage resources globally, as in for many database or VM clusters, rather than cluster-by-cluster. It has similarities to ASM, but introduces a ton of new capabilities including resource pooling, and very cool database instant snapshot and cloning features. More on those another time. Back to my “broken” database.
As my database won’t start – not even in mount mode – I can’t easily update the vector_memory_size parameter. So I need to do the following:
Extract the spfile from Exascale as a text file
Remove or change the vector_memory_size parameter
Create an spfile from the edited text file
Start the database
Exascale aside, I sure most if not all DBA’s have had to do this at some point in their careers.
Step 1 – get the spfile!
SQL*Plus and sqlcl make this easy. Simply fire up your chosen utility and
SQL> create pfile='/tmp/pfile.ora' from spfile;
That gets us our parameters out of Exascale into an easily editable text file.
Step 2 – edit the pfile!
Again, this is pretty simple. Start your text editor of choice, e.g. vi, emacs, nano, pico, etc, and make the required changes to the file you created in the last step.
In my case, rather than remove or downsizing the memory allocation for vector_memory_size, I’m going to up-size my SGA.
For the sake of comparison, this was the SGA size before I shotdown the database and realized what I’d done.
SQL> show sga

Total System Global Area 6439969072 bytes
Fixed Size		    5439792 bytes
Variable Size		 2030043136 bytes
Database Buffers	 2248146944 bytes
Redo Buffers		    8855552 bytes
In-Memory Area		 2147483648 bytes
Vector Memory Area	 2147483648 bytes
Step 3 – (re)create the spfile from the edited pfile!
Now we have a pfile, we need to re-create the spfile in Exascale so both instances in my cluster can access it.
First, we’ll create an spfile from the pfile in SQL*Plus or sqlcl
SQL> create spfile from pfile='/tmp/pfile.ora'
This will create an spfile in the $ORACLE_HOME/dbs directory of the database VM you are currently on. In my case, its called $ORACLE_HOME/dbs/spfilec8db12.ora
$ ls -al $ORACLE_HOME/dbs/spfilec8db12.ora
-rw-r----- 1 oracle dba 8704 May 27 22:12 /u01/app/oracle/product/23.7.0.25/dbhome_1/dbs/spfilec8db12.ora
Next, we need to backup the existing spfile. I may be a Product Manager these days, but good old DBA instincts are hard to suppress.
First, lets get the location of our databases spfile using srvctl.
XSH includes a cp command that allows us to copy files in and out of Exascale storage. ASM has a similar capability.
Using XSH, we’ll copy our file current spfile to a safe location.
$ xsh cp @exapm13050608vault/EXAPM13050608-82B1CA80638E4F86BF2E4B3EABC7B6E7/C8DB1/PARAMETERFILE/spfile.OMF.628AA9E0 /tmp

$ ls -al spfile.OMF.628AA9E0
-rw-rw---- 1 oracle oinstall 8704 May 27 22:15 spfile.OMF.628AA9E0
Now we can copy our new spfile back into Exascale using XSH. Note in the command below, tell XSH that its copying in an ‘init‘ file with the --ftype attribute.
$ xsh cp --ftype init $ORACLE_HOME/dbs/spfilec8db12.ora @exapm13050608vault/EXAPM13050608-82B1CA80638E4F86BF2E4B3EABC7B6E7/C8DB1/PARAMETERFILE/spfile.OMF.628AA9E0

$ xsh ls -l @exapm13050608vault/EXAPM13050608-82B1CA80638E4F86BF2E4B3EABC7B6E7/C8DB1/PARAMETERFILE/spfile.OMF.628AA9E0
            8704             Mar 10 15:24:05 2025 @exapm13050608vault/EXAPM13050608-82B1CA80638E4F86BF2E4B3EABC7B6E7/C8DB1/PARAMETERFILE/spfile.OMF.628AA9E0
Step 4 – restart the database!
Finally, use srvctl to restart the database
$ srvctl start database -db C8DB1
Success! The database is back up and running.
Comparing the SGA now with the earlier one, you can see I added 4 GB to the sga_max_size and sga_target being the total to 10 GB.
SQL> show sga

Total System Global Area   10736573488 bytes
Fixed Size                     7076912 bytes
Variable Size               2516582400 bytes
Database Buffers            3909091328 bytes
Redo Buffers                   8855552 bytes
In-Memory Area              2147483648 bytes
Vector Memory Area          2147483648 bytes
And that’s it. You can copy spfiles in and out of Exascale. In reality, you can copy many more file types in and out – check out the XSH – the Exascale Shell command reference for all the details.
While I still have access to an ExaCS, I wanted to check out the new feature available in the OCI console to patch an Oracle DB by moving it from one home to another (ie 19.4 to 19.6, not 12.2.0.1 to 19.x…).
In reality, you might want to create an older home so you can restore a backup of a database, test patching procedures, performance and stability (using Real Application Testing) – to name a few ideas.
Sounds all well and good, but I currently have a 19.6 DB, running on a 19.6 GI/ASM stack and am not in the position to patch to 19.7 at the moment. So what can I do?
So we need to create a new Oracle Home – one with an RU (release update) of lower than 19.6.
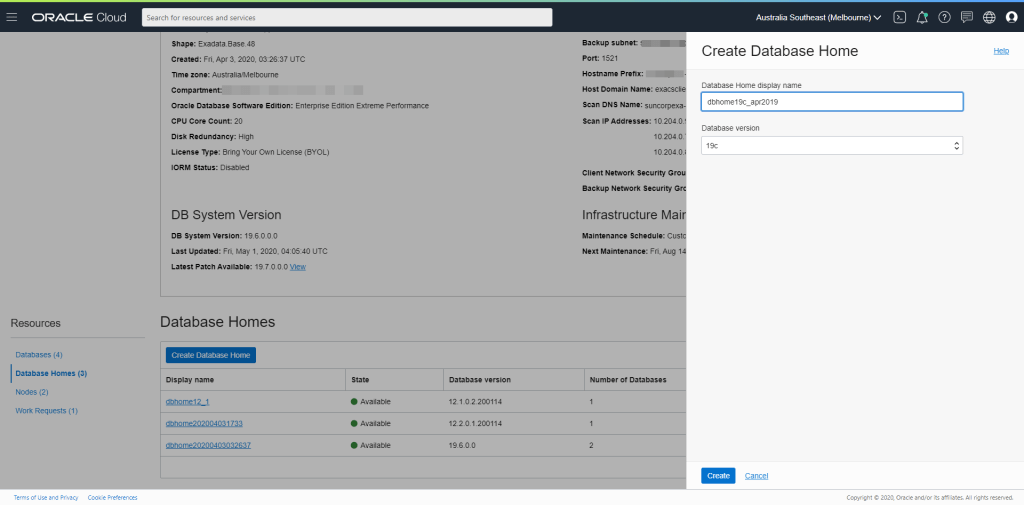
In the console, when I hit “Create Database Home”, it gives me the below options – note that they do not list the specific Release Update or Bundle Patch version.
Create Database Home dialog
As I mentioned, this is an ExaCS instance I created with 19.6 GI/ASM and 19.6 Database (currently the default RU version on this particular instance).
What I need to do is download an earlier RU for ExaCS, activate it as the default, and then create a new Oracle Home either through the above console or using OCI CLI. So lets look at whats already on the ExaCS instance.
Log on to one of the nodes as opc and sudo su - (sudo to root)
We’re then going to fire up the dbaascli tool to check work with the ExaCS environment
[root@exacs-asxyq1 ~]# dbaascli
DBAAS CLI version 19.4.4.0.0DBGI
DBAAS>
First, lets check what Database Home images have already been downloaded to the ACFS software library using the dbimage list command
DBAAS> dbimage list
Executing command dbimage list

INFO : Log file => /var/opt/oracle/log/dbimage_list/dbimage_list_2020-05-12_14:31:36.56429682748.log
INFO : dbimage fixup executed.

################## List of Available dbimages on acfs  ###################

-JAN2020 (For DB Versions 11204, 12102, 12201, 18000, 19000) => 24G consumed on acfs
-OCT2019 (For DB Versions 19000) => 4.0G consumed on acfs

######################## Default BP on acfs #############################

-11204 => JAN2020
-12102 => JAN2020
-12201 => JAN2020
-18000 => JAN2020
-19000 => JAN2020

################## Acfs disk space usage ######################

 Filesystem              Size  Used Avail Use% Mounted on
/dev/asm/acfsvol01-377  560G   45G  516G   8% /acfs01

################# /var/opt/oracle/dbaas_acfs/dbnid space usage ###################

 29G
As you can see from lines 9 & 10, I currently have Oracle Home images for the JAN2020 RU/BPs for versions 11.2, 12.1, 12.2, 18c & 19c. I also have the OCT2019 RU for 19c already downloaded.
Also note that the current default RU/BPs for each release are listed as:
11204 => JAN2020
12102 => JAN2020
12201 => JAN2020
18000 => JAN2020
19000 => JAN2020
Now lets check what Oracle Home images are available to download using the cswlib list command.
DBAAS>cswlib list
Executing command cswlib list

INFO : Log file => /var/opt/oracle/log/list/list_2020-05-12_14:25:49.32901082748.log
INFO : dbimage fixup executed.

############ List of Available BP #############
-APR2017 (For DB Versions  12201 12102 11204)
-JAN2018 (For DB Versions  12201 12102 11204)
-APR2018 (For DB Versions  12201 12102 11204)
-JUL2018 (For DB Versions  18000 12201 12102 11204)
-OCT2018 (For DB Versions  18000 12201 12102 11204)
-JAN2019 (For DB Versions  18000 12201 12102 11204)
-APR2019 (For DB Versions  18000 12201 12102 11204 19000)
-JUL2019 (For DB Versions  18000 12201 12102 11204 19000)
-OCT2019 (For DB Versions  18000 12201 12102 11204 19000)
-JAN2020 (For DB Versions  18000 12201 12102 11204 19000)

############ List of Available NONCDB BP #######
-APR2018 (For DB Versions  12201 12102)
-JAN2019 (For DB Versions  12201 12102)
-APR2019 (For DB Versions  12201 12102)
-JUL2019 (For DB Versions  12201 12102)
-OCT2019 (For DB Versions  12102 19000)
-JAN2020 (For DB Versions  12102 19000)
UPDATE – 29th September 2020 – dbaascli cswlib list|download now only allows you to operate on the current, and two most recent RUs – ie, N, N-1 and N-2. See the screen grab below
DBAAS>cswlib list
Executing command cswlib list

INFO : Log file => /var/opt/oracle/log/list/list_2020-09-29_15:08:33.757113220980.log
INFO : dbimage fixup executed.

############ List of Available BP #############
-JAN2020 (For DB Versions  18000 12201 12102 11204 19000)
-APR2020 (For DB Versions  18000 12201 12102 11204 19000)
-JUL2020 (For DB Versions  18000 12201 12102 11204 19000)

############ List of Available NONCDB BP #######
-JAN2020 (For DB Versions  12102 19000)
-APR2020 (For DB Versions  12102 19000)
-JUL2020 (For DB Versions  12102 19000)
Without going through each matrix in detail, you can see that there are two kinds of images – CDB (the top list) and NONCDB (second list, and for use during migrations to OCI).
DBAAS>cswlib download --version 19000 --bp APR2019
Executing command cswlib download --version 19000 --bp APR2019
INFO : Download running for BP APR2019 and version 19000, it may take few mins...
INFO: CSWLIB update APR2019 db image bits
INFO: Log file is: /var/opt/oracle/log/misc/cswlib/cswlib_2020-05-12_14:41:33.397675181223.log
INFO : dbimage fixup executed.
INFO: CSWLIB update_bits of APR2019 19000 succeded !
INFO: dbaascli dbimage activateBP needs to be run to make the downloaded BP the “default” !
The least amount of information needed to download the RU/BP in question is the version & the BP name. In our case, we’re working with Oracle 19c (19000) and the ARP2019 RU.
Once this has been downloaded you can rerun dbimage list to check it is available on the ExaCS. Also note that the current default is has not been changed as part of the download process.
DBAAS>dbimage list
Executing command dbimage list

INFO : Log file => /var/opt/oracle/log/dbimage_list/dbimage_list_2020-05-12_15:59:24.01757782748.log
INFO : dbimage fixup executed.

################## List of Available dbimages on acfs  ###################

-JAN2020 (For DB Versions 11204, 12102, 12201, 18000, 19000) => 24G consumed on acfs
-OCT2019 (For DB Versions 19000) => 4.0G consumed on acfs
-APR2019 (For DB Versions 19000) => 3.6G consumed on acfs

######################## Default BP on acfs #############################

-11204 => JAN2020
-12102 => JAN2020
-12201 => JAN2020
-18000 => JAN2020
-19000 => JAN2020

################## Acfs disk space usage ######################

 Filesystem              Size  Used Avail Use% Mounted on
/dev/asm/acfsvol01-377  560G   49G  512G   9% /acfs01

################# /var/opt/oracle/dbaas_acfs/dbnid space usage ###################

 32G
Next, we need to Activate the ARP2019 image as the default so we can then kick off the deployment of the home to the two ExaCS compute nodes. We do this using the dbimage activateBP command.
DBAAS>dbimage activateBP --version 19000 --bp APR2019
Executing command dbimage activateBP --version 19000 --bp APR2019
INFO : Log file is => /var/opt/oracle/log/dbimage_activateBP/dbimage_activateBP_2020-05-12_16:01:50.51664582748.log
INFO : dbimage fixup executed.
INFO : activateBP completed
Checking the dbimage list again, we can see the APR2019 image is now the default for 19000
DBAAS>dbimage list
Executing command dbimage list
...
snipped for brevity
...
######################## Default BP on acfs #############################

-11204 => JAN2020
-12102 => JAN2020
-12201 => JAN2020
-18000 => JAN2020
-19000 => APR2019
...
Now that we have activated to APR2019 RU, we can deploy the home. Unfortunately (or maybe fortunately) this is not done through the dbaascli. Instead, we can use either the OCI browser console or using the OCI CLI. Lets use the browser console.
Navigate to your ExaCS -> Database Homes and click Create Database Home.
ExaCS – Create Database Home
As shown above, when you create a new Database on the ExaCS, you choose the major database version, not the RU. We’ll choose 19c – given thats what we downloaded.
Once you’ve give the home a name (or used the auto-generated one). Press Create.
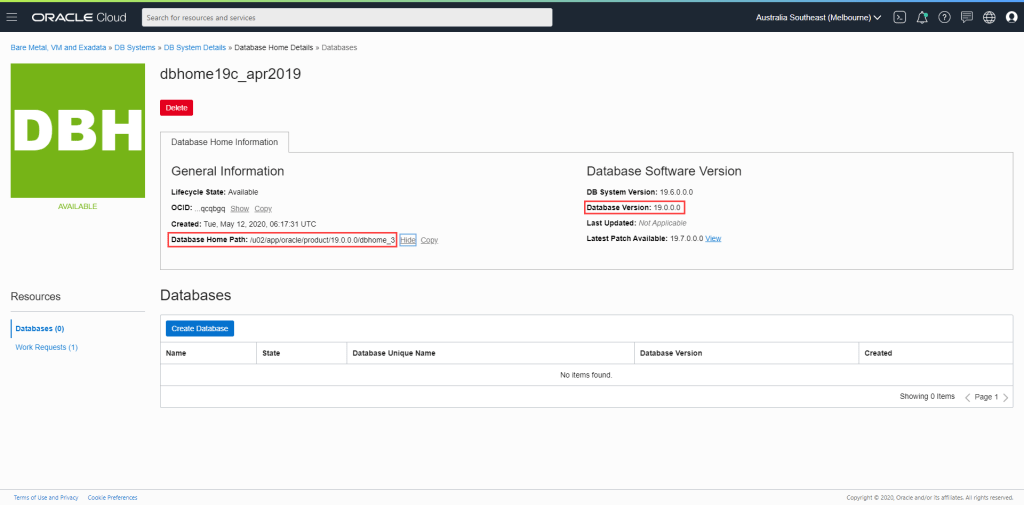
Complete
Once created, you can see the Database Home Path and the Database Version. Note that it takes a little while for the console to reflect the actual version – in this case it will reflect 19.3.0.0.
We can check the version before proceeding by running opatch lsinventory from the newly created Database Home (after setting the ORACLE_HOME accordingly).
[oracle@exacs-asxyq1 ~]$ export ORACLE_HOME=/u02/app/oracle/product/19.0.0.0/dbhome_3
[oracle@exacs-asxyq1 ~]$ $ORACLE_HOME/OPatch/opatch lsinventory
Oracle Interim Patch Installer version 12.2.0.1.17
Copyright (c) 2020, Oracle Corporation.  All rights reserved.


Oracle Home       : /u02/app/oracle/product/19.0.0.0/dbhome_3
Central Inventory : /u01/app/oraInventory
   from           : /u02/app/oracle/product/19.0.0.0/dbhome_3/oraInst.loc
OPatch version    : 12.2.0.1.17
OUI version       : 12.2.0.7.0
Log file location : /u02/app/oracle/product/19.0.0.0/dbhome_3/cfgtoollogs/opatch/opatch2020-05-12_17-03-26PM_1.log

Lsinventory Output file location : /u02/app/oracle/product/19.0.0.0/dbhome_3/cfgtoollogs/opatch/lsinv/lsinventory2020-05-12_17-03-26PM.txt

--------------------------------------------------------------------------------
Local Machine Information::
Hostname: exacs-asxyq1.exacsclient.suncorpmelvcn.oraclevcn.com
ARU platform id: 226
ARU platform description:: Linux x86-64

Installed Top-level Products (1):

Oracle Database 19c                                                  19.0.0.0.0
There are 1 products installed in this Oracle Home.


Interim patches (3) :

Patch  29548437     : applied on Sat Apr 20 07:53:25 AEST 2019
Unique Patch ID:  22861714
Patch description:  "OJVM RELEASE UPDATE: 19.3.0.0.190416 (29548437)"
   Created on 11 Apr 2019, 02:24:07 hrs PST8PDT
   Bugs fixed:
     29540327, 29254623, 29445548

Patch  29585399     : applied on Thu Apr 18 17:21:33 AEST 2019
Unique Patch ID:  22840393
Patch description:  "OCW RELEASE UPDATE 19.3.0.0.0 (29585399)"
   Created on 9 Apr 2019, 19:12:47 hrs PST8PDT
   Bugs fixed:
     SNIPPED

Patch  29517242     : applied on Thu Apr 18 17:21:17 AEST 2019
Unique Patch ID:  22862832
Patch description:  "Database Release Update : 19.3.0.0.190416 (29517242)"
   Created on 17 Apr 2019, 23:27:10 hrs PST8PDT
   SNIPPED


--------------------------------------------------------------------------------

OPatch succeeded.
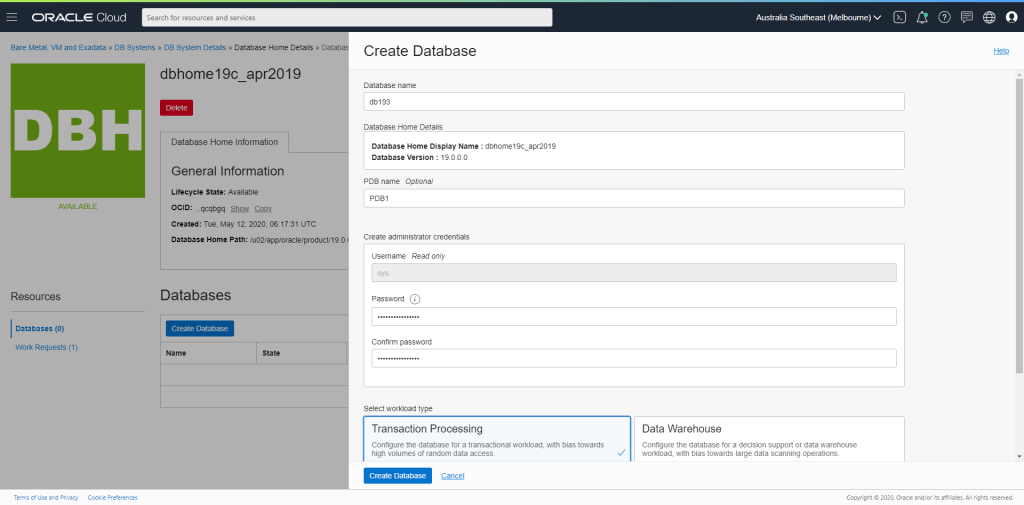
Lets create our database now. Press Create Database and fill in the subsequent dialog as you see fit. Perhaps something like the following:
Create Database
I also enabled Automatic Backups with a 7 Day Retention Period
Once the database has been created (and the auto backup finished) you’ll see your database is now available and ready to go. Note again that it will take a little while for the console to reflect that the database version is 19.3.0.0.
Once you have the above done, you can then proceed to create an ExaCS. You could do this through the Web Console, but when I was presented with what I assume is a bug in the console, I decided to give the CLI a try.
Before executing the CLI, you need to create two (2) files:
A JSON formatted file that has the create_db_system payload
a file referenced in the main file that contains the SSH public key pair(s) you want to associate with the ExaCS instance
An example (based off the file I used) and explanation follows – you can get the json file from here:
This file contains hidden or bidirectional Unicode text that may be interpreted or compiled differently than what appears below. To review, open the file in an editor that reveals hidden Unicode characters.
Learn more about bidirectional Unicode characters
ENTERPRISE_EDITION_EXTREME_PERFORMANCE is the only option if you're creating an ExaCS
dbName
dbname
Database name for initial DB
dbVersion
LATEST
Database (and therefore ASM/GI) version. I suggest you go with latest. You can then create new DB homes of earlier versions (back to 11.2). This gives you the greatest flexibility.
dbWorkload
OLTP
Is the DB an OLTP or DSS geared DB?
diskRedundancy
HIGH
HIGH ASM disk redundnacy is the only option for ExaCS
displayName
console_display_name
OCI Console Display Name
domain
client_subnet_domain
The domain name for the ExaCS Client network. Used to fully qualify host and SCAN addresses
hostname
hostname_prefix
Hostname prefix – ie 1-8 will be appended depending on the ExaCS Shape
licenseModel
BRING_YOUR_OWN_LICENSE
Are you using existing licenses or are you going LICENSE_INCLUDED?
nodeCount
0
For ExaCS this will be 0 – the number of nodes is determined by the shape.
pdbName
pdb1
The initial PDB name
shape
Exadata.Base.48
This is the ExaCS Shape – eg Exadata.Full3.400 or Exadata.Quarter2.92
sparseDiskgroup
true
Do you want to allocate some space to create/use sparse clones?
sshAuthorizedKeysFile
./keys.txt
Reference to a file with the SSH Public keys you want added to the compute nodes
Once you’ve updated the json file, and created a file for your ssh keys, you can run the following from your OS command line
oci db system launch --from-json file://create_exacs_ocicli.json
ExaCS will take a while to create – its doing a fair amount of work – so at this point, grab a coffee (or dinner & a movie depending on the time of day) and keep an eye on the progress through the OCI Console.
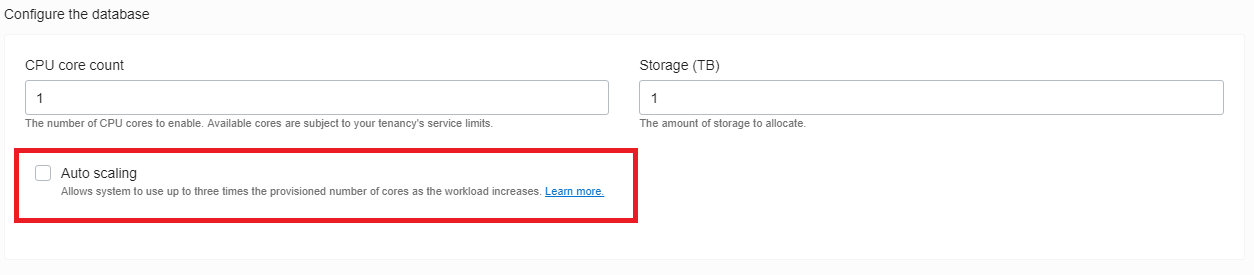
Autoscaling for Autonomous Database (Shared or Serverless) was made available in May 2019. So what is it? And how does it work?
First and foremost, the UI has changed a little as of the time of writing. This seems to be due to the release TODAY for the Dedicated Autonomous Transaction Processing service (more on this in a future post). That said, creating an ADW or ATP is just as easy as it was before, but now you’ll also see the new checkbox as shown in the image below.
Create new ADW/ATP dialog
So as you can see, enabling Autoscaling is as easy as checking this box when you create a new ADW/ATP or, you can come back and modify an existing database using the Scale Up/Down link (or API).
Scale Up/Down dialog
But what is the database doing under the hood? Well, if you’ve played with the Autonomous DB platform in the past, you may have poked around the internal views to see how Oracle has configured the service.
Lets start with definition of what Autoscaling in Autonomous DB means:
Enabling auto scaling allows an Autonomous Data Warehouse database to use up to three times more CPU and IO resources than the currently specified CPU Core Count (up to a maximum of 128 CPU cores). When auto scaling is enabled, if your workload requires additional CPU and IO resources the database automatically uses the resources without any manual intervention required.(Source – ADW New Features Doc)
So this means that Oracle will autonomously make upto 3x the CPU and IO resources available for workloads in the database as and when needed.
Back to the internal views – if you’ve looked into a ADW/ATP that does not have autoscaling enabled, you may have fired off this command in SQL Developer/SQL*Plus:
show cpu_count
For non-autoscaling instances, this will be set to the same number as the number of OCPUs you have configured for your ADW/ATP. E.g. – if you have configured 4 OCPUs, cpu_count will be set to 4.
For instances with Autoscaling enabled, this will be set to the 3x the number of OCPUs you have chosen to configure. E.g. – if you have configured 4 OCPUs, cpu_count will be set to 12.
So, with Autoscaling enabled, you already have access to 3x the number of OCPUs. The database doesn’t need to monitor workload and make decisions about when it needs to add resources or attempt to understand the best time to remove resources. They are already there.
BUT, just because you have access to them, doesn’t mean that you are paying for them. With autoscaling enabled, you pay for the configured OCPUs as a base – so 4 in the example above – and for usage between 4 and 12 OCPUs, Oracle takes the average usage above the configured baseline.
The final point to make is that with Autoscaling enabled, the parallel degree limit for the high and medium services remains set to the number of OCPUs configured, not the 3x value.
As of today, you can now clone Autonomous Databases – both ADW and ATP – in Oracle Cloud Infrastructure.
This was an oft requested feature for the service and its great to see that its now available.
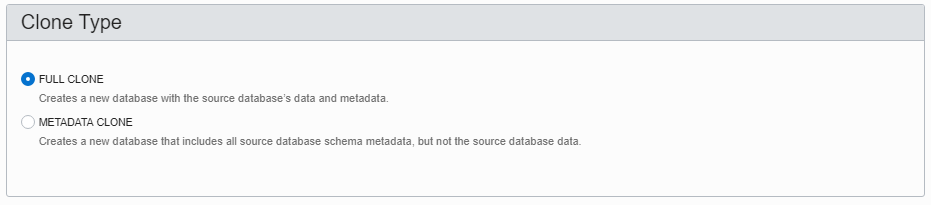
You have the choice of having a full clone or metadata only clone created.
Full clones are a full clone of the PDB underlying the database – users, stored procs, tables, partitions, indexes, table stats, DATA – the works…
Metadata clones are as they sound – all the metadata describing the database, objects, tables, users etc – BUT NO DATA.
To create a clone, you need a previously created ADW or ATP:
Heres some I prepared earlier
Next – hover over the ellipsis (three dots) on the right hand side and select “Create Clone”
Create Clone
You’ll then be presented with a familiar dialog box to choose the amount of CPU, Storage the database needs, what the new ADMIN password for the clone will be and what your choice in license (Included or Bring Your Own).
You can also choose the compartment the clone will be created in.
Most importantly, you get the choice (right up top) of the kind of clone you want – FULL CLONE or METADATA CLONE
Full or not full, that is the question
Once you’ve made you choices, click “Create Autonomous Database Clone” and the platform will go ahead and clone your ADW or ATP just as it would were it provisioning a new Autonomous Database.
When its done, it’ll act and behave just like the source Autonomous Database it was cloned from. You can scale up/down CPU and storage or stop the CPUs all together.
Bear in mind the clone is not linked to the source database .. Any changes you make to the source database stay in the source database.
And there you have it – Autonomous Database Clones!
For more information, check the following doco pages:
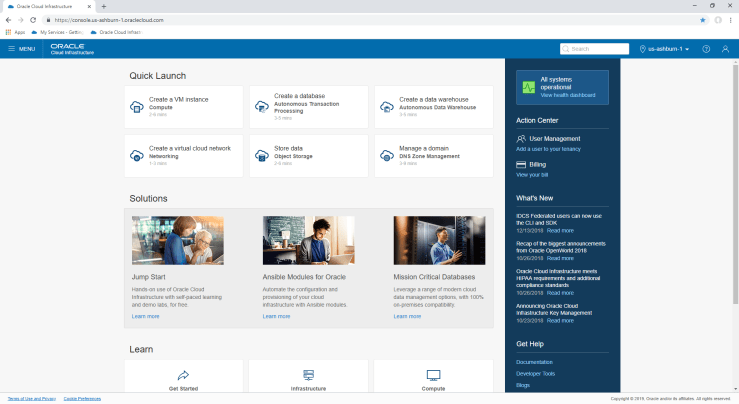
This guide walks you through creating an Oracle 18c Database System in Oracle Cloud Infrastructure (OCI).
Note: I am assuming that you have already created all the necessary networking components in your OCI tenancy.
OCI Home Page
Starting from the OCI Home page, hit the Menu link in the top left-hand corner, and the select “Bare Metal, VM, and Exadata” under the Database heading.
Check you’re in the right compartment
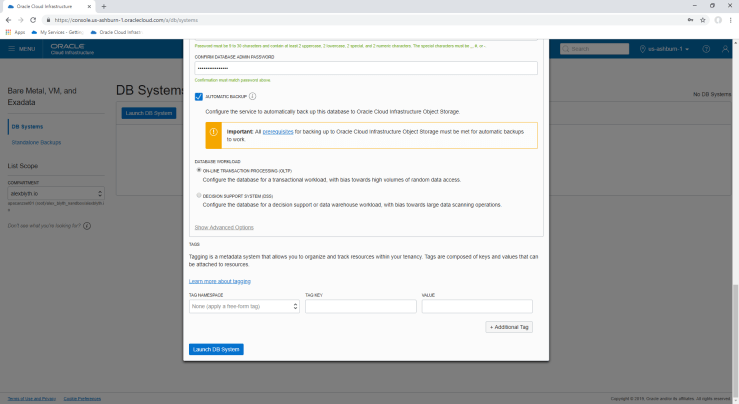
Hit the blue “Launch DB System” button and fill in the form and press “Launch DB System” at the bottom
After you hit “Launch DB System”, the console will report the system is provisioning
Database system being provisioned
Time to grab a cuppa or lunch and leave this to run for a while. You’ll know when its done when the orange box with “DBS” in it goes a lovely green colour.
And you’re done. You can now ssh to the VM and start using the database.
To connect applications, SQL Developer etc, you’ll have to add port 1521 to the subnet Security List the Database System was provisioned in. Port 1521 is already open on the VM firewall.
Oracle Database Cloud Service (in Oracle Cloud Infrastructure – Classic) comes with APEX and Oracle Rest Data Services (ORDS) ready and raring to go. ‘
Specifically, this “guide” pertains to ORDS running in standalone mode on Oracle DBCS in OCI-Classic. Standalone mode uses the embedded http server “Jetty”. If you’re using Tomkat or Weblogic then check the appropriate documentation on how to use SSL certs.


You must be logged in to post a comment.