I often get questions about Exadata, running Oracle Database on Exadata, and running Oracle Database in general.
A more “general” database question I got recently—though it has an Exadata and Exascale basis—is, “How can an administrator prevent a standby database from being used in a switchover or failover event?”
Why would you prevent a standby from being used for its core purpose?
This needs more context. The background is that an organization plans to set up a primary database system and a DR system. They also have a nonprod (dev/test) environment in which they want production-like data to make development and testing more robust. They want to create multiple clones of a gold-image nonprod database so that, when they provide production-like data to developers, they can mask the data once and clone it many times.
They are interested in Exascale for its ability to create database clones efficiently and quickly.
So how does this all come together, and how does it relate to the question?
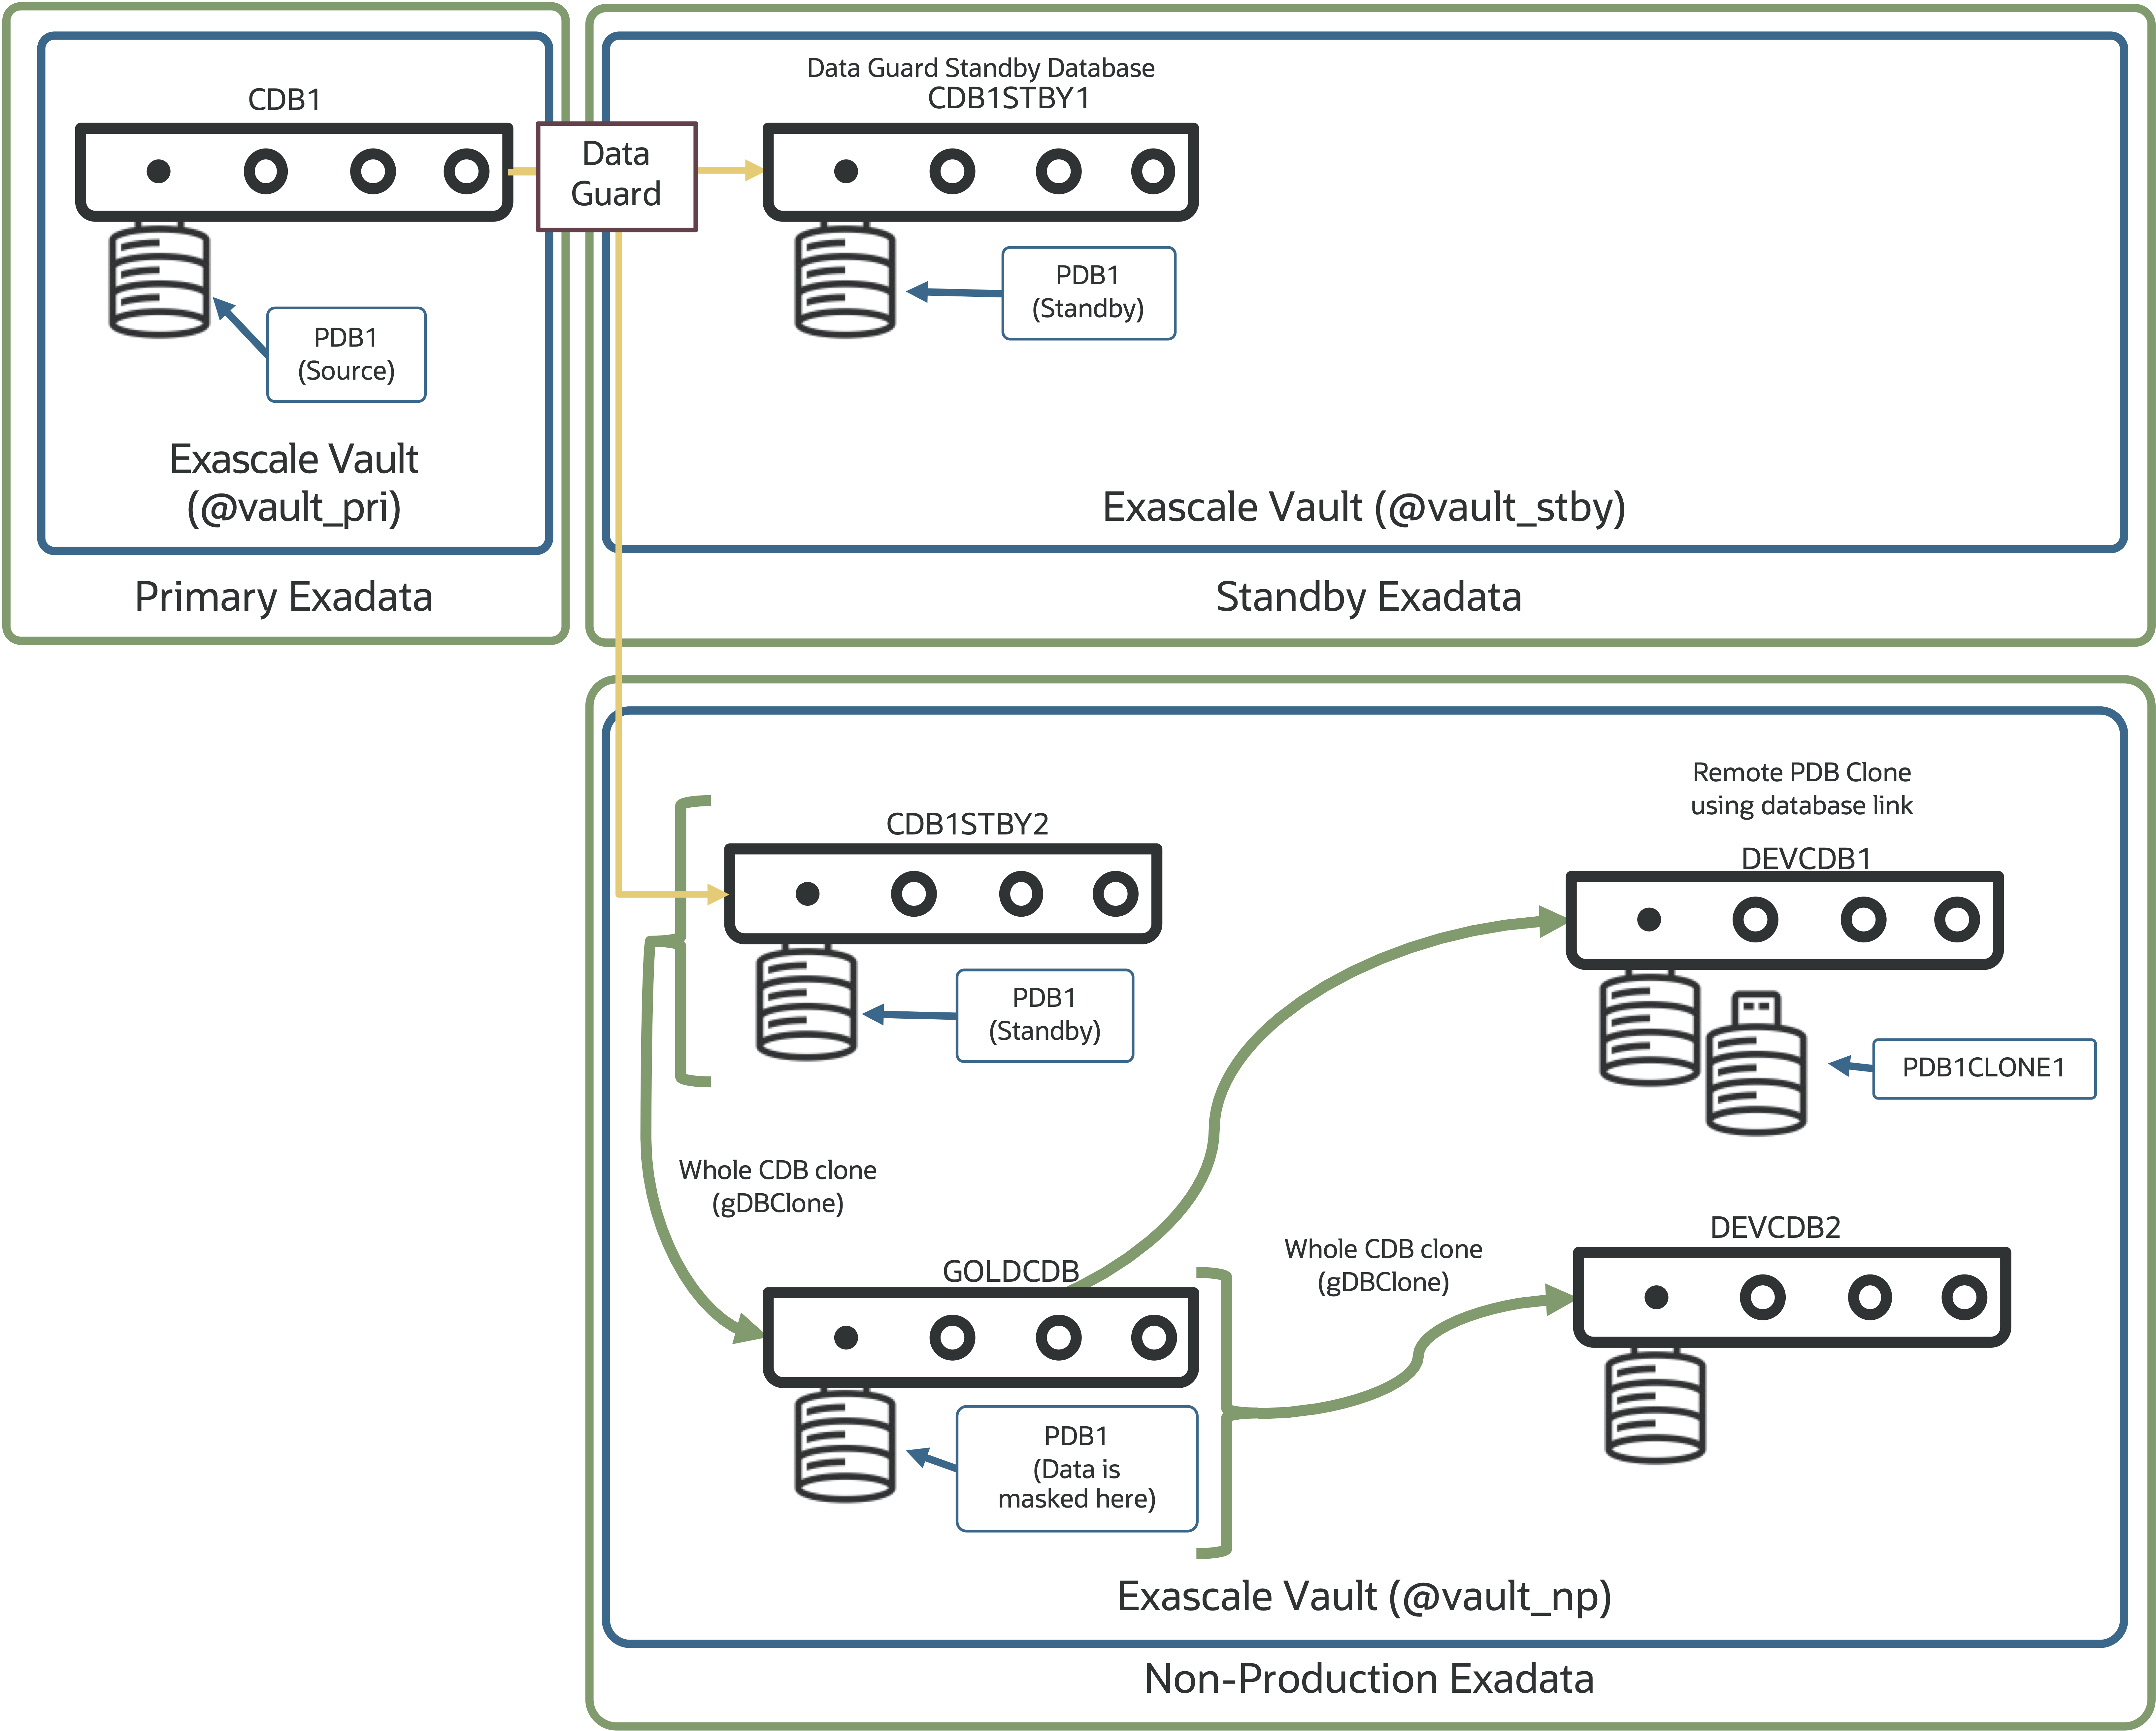
First, a Data Guard standby database can serve as the source for subsequent database clones on Exascale. Oracle recommends using a secondary standby database for this purpose, to separate the DR function from cloning. In other words, use at least two standby databases—one for DR and one as the source of your clones.
The second standby database is kept up to date by the primary, as with the DR database.
You can then create a clone from the second standby database and mask it with your favorite tool, such as Enterprise Manager, to create your gold‑image database.
Finally, you can create database clones using gDBClone at the CDB level, or run ‘CREATE PLUGGABLE DATABASE clonepdb FROM sourcepdb SNAPSHOT COPY;’ for PDB‑level clones on Exascale.
The resulting environment looks like this:
This brings us closer to the initial question: How can I prevent my secondary standby database (CDB1STBY2) from being used for DR?
Let’s come back to why this is even a question.
The secondary standby database (CDB1STBY2) is in a separate Exadata environment—likely in a different network zone and possibly on a system not sized for the production workload.
To prevent the secondary standby from being switched to or failed over, Data Guard Broker (starting with 19.26 and 26ai) lets you specify which databases can assume the primary role using the “PrimaryDatabaseCandidates” property. Any databases in the configuration not listed in this property cannot be switched to or failed over using Data Guard Broker.
If we try to switch over or fail over to CDB1STBY2 now, Data Guard Broker will prevent the operation because we told it not to allow this database to become the primary.
DGMGRL> switchover to CDB1STBY2;
2026-01-12T15:16:23.812-07:00
Performing switchover NOW, please wait...

Error: ORA-16529: Switchover and failover operations are restricted to databases specified in the PrimaryDatabaseCandidates configuration property.

Failed.
2026-01-12T15:16:23.954-07:00
Unable to switchover, primary database is still "CDB1"
And that’s it – using Data Guard Broker to prevent specific standby databases from becoming a primary database is easy, and for environments
If you take one thing away, make it this: keep two standbys—one for DR, one for clones.
If you take two things away, the second is that Data Guard Broker can help ensure only the databases you want to allow to become primary can take on that responsibility.
A quick shout out to Ludovico Caldera who pointed me in the direction of this useful feature in Data Guard Broker.
While I still have access to an ExaCS, I wanted to check out the new feature available in the OCI console to patch an Oracle DB by moving it from one home to another (ie 19.4 to 19.6, not 12.2.0.1 to 19.x…).
In reality, you might want to create an older home so you can restore a backup of a database, test patching procedures, performance and stability (using Real Application Testing) – to name a few ideas.
Sounds all well and good, but I currently have a 19.6 DB, running on a 19.6 GI/ASM stack and am not in the position to patch to 19.7 at the moment. So what can I do?
So we need to create a new Oracle Home – one with an RU (release update) of lower than 19.6.
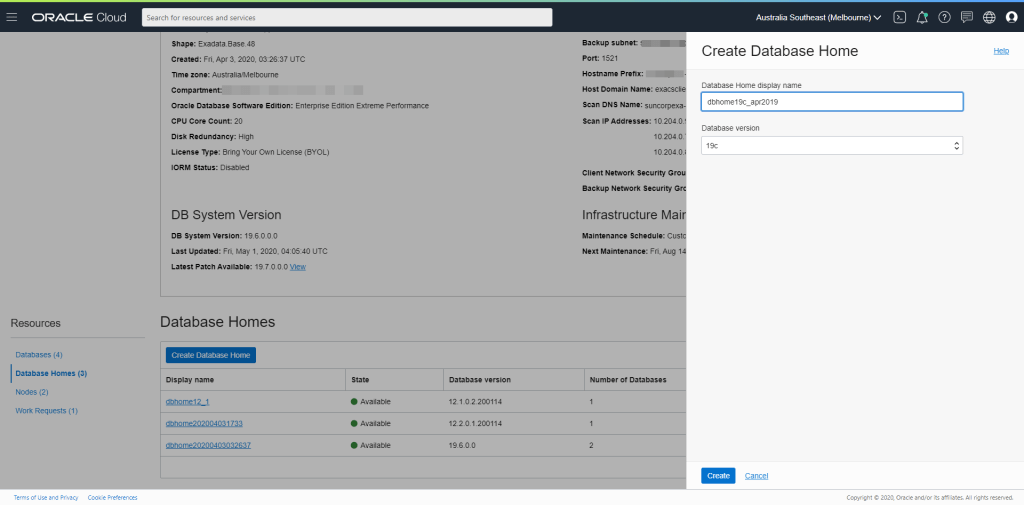
In the console, when I hit “Create Database Home”, it gives me the below options – note that they do not list the specific Release Update or Bundle Patch version.
Create Database Home dialog
As I mentioned, this is an ExaCS instance I created with 19.6 GI/ASM and 19.6 Database (currently the default RU version on this particular instance).
What I need to do is download an earlier RU for ExaCS, activate it as the default, and then create a new Oracle Home either through the above console or using OCI CLI. So lets look at whats already on the ExaCS instance.
Log on to one of the nodes as opc and sudo su - (sudo to root)
We’re then going to fire up the dbaascli tool to check work with the ExaCS environment
[root@exacs-asxyq1 ~]# dbaascli
DBAAS CLI version 19.4.4.0.0DBGI
DBAAS>
First, lets check what Database Home images have already been downloaded to the ACFS software library using the dbimage list command
DBAAS> dbimage list
Executing command dbimage list

INFO : Log file => /var/opt/oracle/log/dbimage_list/dbimage_list_2020-05-12_14:31:36.56429682748.log
INFO : dbimage fixup executed.

################## List of Available dbimages on acfs  ###################

-JAN2020 (For DB Versions 11204, 12102, 12201, 18000, 19000) => 24G consumed on acfs
-OCT2019 (For DB Versions 19000) => 4.0G consumed on acfs

######################## Default BP on acfs #############################

-11204 => JAN2020
-12102 => JAN2020
-12201 => JAN2020
-18000 => JAN2020
-19000 => JAN2020

################## Acfs disk space usage ######################

 Filesystem              Size  Used Avail Use% Mounted on
/dev/asm/acfsvol01-377  560G   45G  516G   8% /acfs01

################# /var/opt/oracle/dbaas_acfs/dbnid space usage ###################

 29G
As you can see from lines 9 & 10, I currently have Oracle Home images for the JAN2020 RU/BPs for versions 11.2, 12.1, 12.2, 18c & 19c. I also have the OCT2019 RU for 19c already downloaded.
Also note that the current default RU/BPs for each release are listed as:
11204 => JAN2020
12102 => JAN2020
12201 => JAN2020
18000 => JAN2020
19000 => JAN2020
Now lets check what Oracle Home images are available to download using the cswlib list command.
DBAAS>cswlib list
Executing command cswlib list

INFO : Log file => /var/opt/oracle/log/list/list_2020-05-12_14:25:49.32901082748.log
INFO : dbimage fixup executed.

############ List of Available BP #############
-APR2017 (For DB Versions  12201 12102 11204)
-JAN2018 (For DB Versions  12201 12102 11204)
-APR2018 (For DB Versions  12201 12102 11204)
-JUL2018 (For DB Versions  18000 12201 12102 11204)
-OCT2018 (For DB Versions  18000 12201 12102 11204)
-JAN2019 (For DB Versions  18000 12201 12102 11204)
-APR2019 (For DB Versions  18000 12201 12102 11204 19000)
-JUL2019 (For DB Versions  18000 12201 12102 11204 19000)
-OCT2019 (For DB Versions  18000 12201 12102 11204 19000)
-JAN2020 (For DB Versions  18000 12201 12102 11204 19000)

############ List of Available NONCDB BP #######
-APR2018 (For DB Versions  12201 12102)
-JAN2019 (For DB Versions  12201 12102)
-APR2019 (For DB Versions  12201 12102)
-JUL2019 (For DB Versions  12201 12102)
-OCT2019 (For DB Versions  12102 19000)
-JAN2020 (For DB Versions  12102 19000)
UPDATE – 29th September 2020 – dbaascli cswlib list|download now only allows you to operate on the current, and two most recent RUs – ie, N, N-1 and N-2. See the screen grab below
DBAAS>cswlib list
Executing command cswlib list

INFO : Log file => /var/opt/oracle/log/list/list_2020-09-29_15:08:33.757113220980.log
INFO : dbimage fixup executed.

############ List of Available BP #############
-JAN2020 (For DB Versions  18000 12201 12102 11204 19000)
-APR2020 (For DB Versions  18000 12201 12102 11204 19000)
-JUL2020 (For DB Versions  18000 12201 12102 11204 19000)

############ List of Available NONCDB BP #######
-JAN2020 (For DB Versions  12102 19000)
-APR2020 (For DB Versions  12102 19000)
-JUL2020 (For DB Versions  12102 19000)
Without going through each matrix in detail, you can see that there are two kinds of images – CDB (the top list) and NONCDB (second list, and for use during migrations to OCI).
DBAAS>cswlib download --version 19000 --bp APR2019
Executing command cswlib download --version 19000 --bp APR2019
INFO : Download running for BP APR2019 and version 19000, it may take few mins...
INFO: CSWLIB update APR2019 db image bits
INFO: Log file is: /var/opt/oracle/log/misc/cswlib/cswlib_2020-05-12_14:41:33.397675181223.log
INFO : dbimage fixup executed.
INFO: CSWLIB update_bits of APR2019 19000 succeded !
INFO: dbaascli dbimage activateBP needs to be run to make the downloaded BP the “default” !
The least amount of information needed to download the RU/BP in question is the version & the BP name. In our case, we’re working with Oracle 19c (19000) and the ARP2019 RU.
Once this has been downloaded you can rerun dbimage list to check it is available on the ExaCS. Also note that the current default is has not been changed as part of the download process.
DBAAS>dbimage list
Executing command dbimage list

INFO : Log file => /var/opt/oracle/log/dbimage_list/dbimage_list_2020-05-12_15:59:24.01757782748.log
INFO : dbimage fixup executed.

################## List of Available dbimages on acfs  ###################

-JAN2020 (For DB Versions 11204, 12102, 12201, 18000, 19000) => 24G consumed on acfs
-OCT2019 (For DB Versions 19000) => 4.0G consumed on acfs
-APR2019 (For DB Versions 19000) => 3.6G consumed on acfs

######################## Default BP on acfs #############################

-11204 => JAN2020
-12102 => JAN2020
-12201 => JAN2020
-18000 => JAN2020
-19000 => JAN2020

################## Acfs disk space usage ######################

 Filesystem              Size  Used Avail Use% Mounted on
/dev/asm/acfsvol01-377  560G   49G  512G   9% /acfs01

################# /var/opt/oracle/dbaas_acfs/dbnid space usage ###################

 32G
Next, we need to Activate the ARP2019 image as the default so we can then kick off the deployment of the home to the two ExaCS compute nodes. We do this using the dbimage activateBP command.
DBAAS>dbimage activateBP --version 19000 --bp APR2019
Executing command dbimage activateBP --version 19000 --bp APR2019
INFO : Log file is => /var/opt/oracle/log/dbimage_activateBP/dbimage_activateBP_2020-05-12_16:01:50.51664582748.log
INFO : dbimage fixup executed.
INFO : activateBP completed
Checking the dbimage list again, we can see the APR2019 image is now the default for 19000
DBAAS>dbimage list
Executing command dbimage list
...
snipped for brevity
...
######################## Default BP on acfs #############################

-11204 => JAN2020
-12102 => JAN2020
-12201 => JAN2020
-18000 => JAN2020
-19000 => APR2019
...
Now that we have activated to APR2019 RU, we can deploy the home. Unfortunately (or maybe fortunately) this is not done through the dbaascli. Instead, we can use either the OCI browser console or using the OCI CLI. Lets use the browser console.
Navigate to your ExaCS -> Database Homes and click Create Database Home.
ExaCS – Create Database Home
As shown above, when you create a new Database on the ExaCS, you choose the major database version, not the RU. We’ll choose 19c – given thats what we downloaded.
Once you’ve give the home a name (or used the auto-generated one). Press Create.
Complete
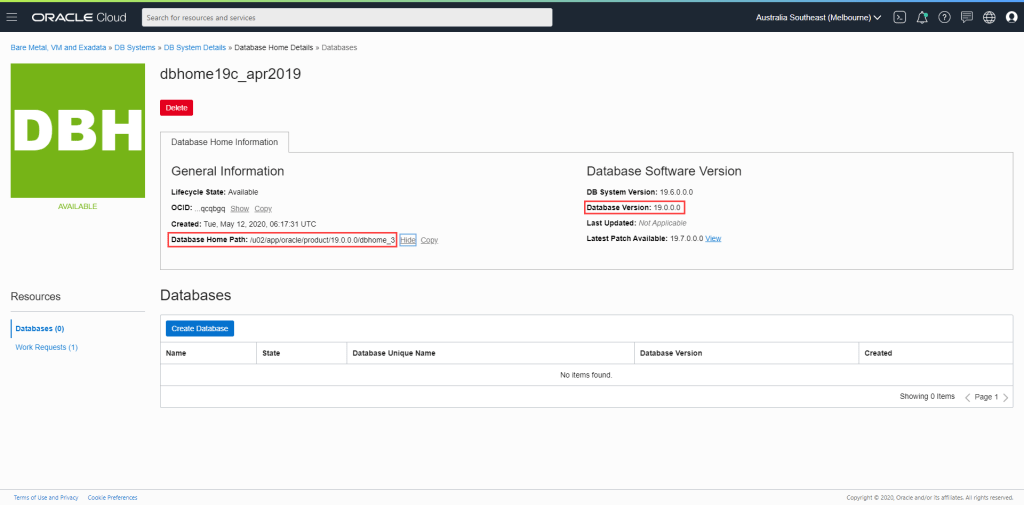
Once created, you can see the Database Home Path and the Database Version. Note that it takes a little while for the console to reflect the actual version – in this case it will reflect 19.3.0.0.
We can check the version before proceeding by running opatch lsinventory from the newly created Database Home (after setting the ORACLE_HOME accordingly).
[oracle@exacs-asxyq1 ~]$ export ORACLE_HOME=/u02/app/oracle/product/19.0.0.0/dbhome_3
[oracle@exacs-asxyq1 ~]$ $ORACLE_HOME/OPatch/opatch lsinventory
Oracle Interim Patch Installer version 12.2.0.1.17
Copyright (c) 2020, Oracle Corporation.  All rights reserved.


Oracle Home       : /u02/app/oracle/product/19.0.0.0/dbhome_3
Central Inventory : /u01/app/oraInventory
   from           : /u02/app/oracle/product/19.0.0.0/dbhome_3/oraInst.loc
OPatch version    : 12.2.0.1.17
OUI version       : 12.2.0.7.0
Log file location : /u02/app/oracle/product/19.0.0.0/dbhome_3/cfgtoollogs/opatch/opatch2020-05-12_17-03-26PM_1.log

Lsinventory Output file location : /u02/app/oracle/product/19.0.0.0/dbhome_3/cfgtoollogs/opatch/lsinv/lsinventory2020-05-12_17-03-26PM.txt

--------------------------------------------------------------------------------
Local Machine Information::
Hostname: exacs-asxyq1.exacsclient.suncorpmelvcn.oraclevcn.com
ARU platform id: 226
ARU platform description:: Linux x86-64

Installed Top-level Products (1):

Oracle Database 19c                                                  19.0.0.0.0
There are 1 products installed in this Oracle Home.


Interim patches (3) :

Patch  29548437     : applied on Sat Apr 20 07:53:25 AEST 2019
Unique Patch ID:  22861714
Patch description:  "OJVM RELEASE UPDATE: 19.3.0.0.190416 (29548437)"
   Created on 11 Apr 2019, 02:24:07 hrs PST8PDT
   Bugs fixed:
     29540327, 29254623, 29445548

Patch  29585399     : applied on Thu Apr 18 17:21:33 AEST 2019
Unique Patch ID:  22840393
Patch description:  "OCW RELEASE UPDATE 19.3.0.0.0 (29585399)"
   Created on 9 Apr 2019, 19:12:47 hrs PST8PDT
   Bugs fixed:
     SNIPPED

Patch  29517242     : applied on Thu Apr 18 17:21:17 AEST 2019
Unique Patch ID:  22862832
Patch description:  "Database Release Update : 19.3.0.0.190416 (29517242)"
   Created on 17 Apr 2019, 23:27:10 hrs PST8PDT
   SNIPPED


--------------------------------------------------------------------------------

OPatch succeeded.
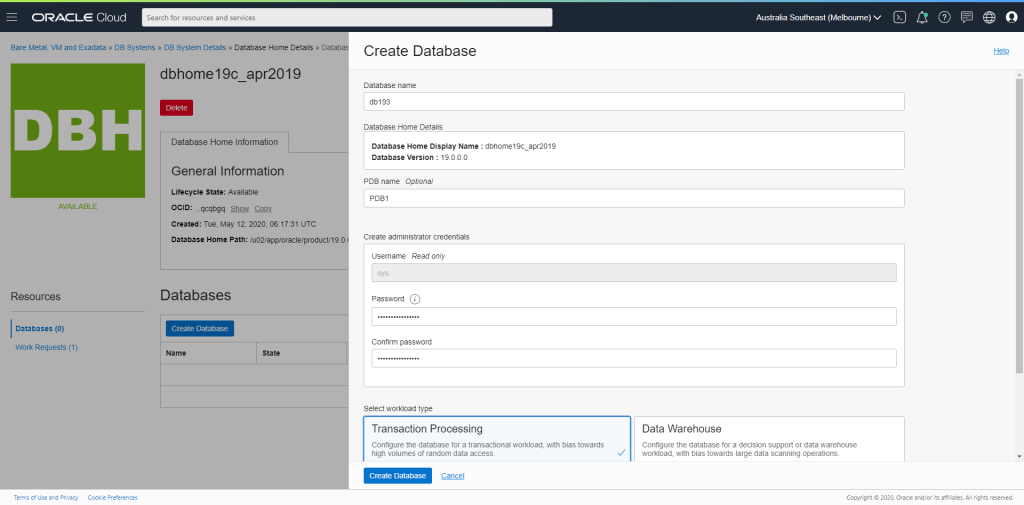
Lets create our database now. Press Create Database and fill in the subsequent dialog as you see fit. Perhaps something like the following:
Create Database
I also enabled Automatic Backups with a 7 Day Retention Period
Once the database has been created (and the auto backup finished) you’ll see your database is now available and ready to go. Note again that it will take a little while for the console to reflect that the database version is 19.3.0.0.
Once you have the above done, you can then proceed to create an ExaCS. You could do this through the Web Console, but when I was presented with what I assume is a bug in the console, I decided to give the CLI a try.
Before executing the CLI, you need to create two (2) files:
A JSON formatted file that has the create_db_system payload
a file referenced in the main file that contains the SSH public key pair(s) you want to associate with the ExaCS instance
An example (based off the file I used) and explanation follows – you can get the json file from here:
This file contains hidden or bidirectional Unicode text that may be interpreted or compiled differently than what appears below. To review, open the file in an editor that reveals hidden Unicode characters.
Learn more about bidirectional Unicode characters
ENTERPRISE_EDITION_EXTREME_PERFORMANCE is the only option if you're creating an ExaCS
dbName
dbname
Database name for initial DB
dbVersion
LATEST
Database (and therefore ASM/GI) version. I suggest you go with latest. You can then create new DB homes of earlier versions (back to 11.2). This gives you the greatest flexibility.
dbWorkload
OLTP
Is the DB an OLTP or DSS geared DB?
diskRedundancy
HIGH
HIGH ASM disk redundnacy is the only option for ExaCS
displayName
console_display_name
OCI Console Display Name
domain
client_subnet_domain
The domain name for the ExaCS Client network. Used to fully qualify host and SCAN addresses
hostname
hostname_prefix
Hostname prefix – ie 1-8 will be appended depending on the ExaCS Shape
licenseModel
BRING_YOUR_OWN_LICENSE
Are you using existing licenses or are you going LICENSE_INCLUDED?
nodeCount
0
For ExaCS this will be 0 – the number of nodes is determined by the shape.
pdbName
pdb1
The initial PDB name
shape
Exadata.Base.48
This is the ExaCS Shape – eg Exadata.Full3.400 or Exadata.Quarter2.92
sparseDiskgroup
true
Do you want to allocate some space to create/use sparse clones?
sshAuthorizedKeysFile
./keys.txt
Reference to a file with the SSH Public keys you want added to the compute nodes
Once you’ve updated the json file, and created a file for your ssh keys, you can run the following from your OS command line
oci db system launch --from-json file://create_exacs_ocicli.json
ExaCS will take a while to create – its doing a fair amount of work – so at this point, grab a coffee (or dinner & a movie depending on the time of day) and keep an eye on the progress through the OCI Console.


You must be logged in to post a comment.