Tag: Oracle

  • Quick Guide to Oracle Database and GI Gold Image Clone Patch Downloads for Exadata

    Quick Guide to Oracle Database and GI Gold Image Clone Patch Downloads for Exadata

    Sometimes its the little things that annoy me the most. OK, maybe its more often than sometimes.

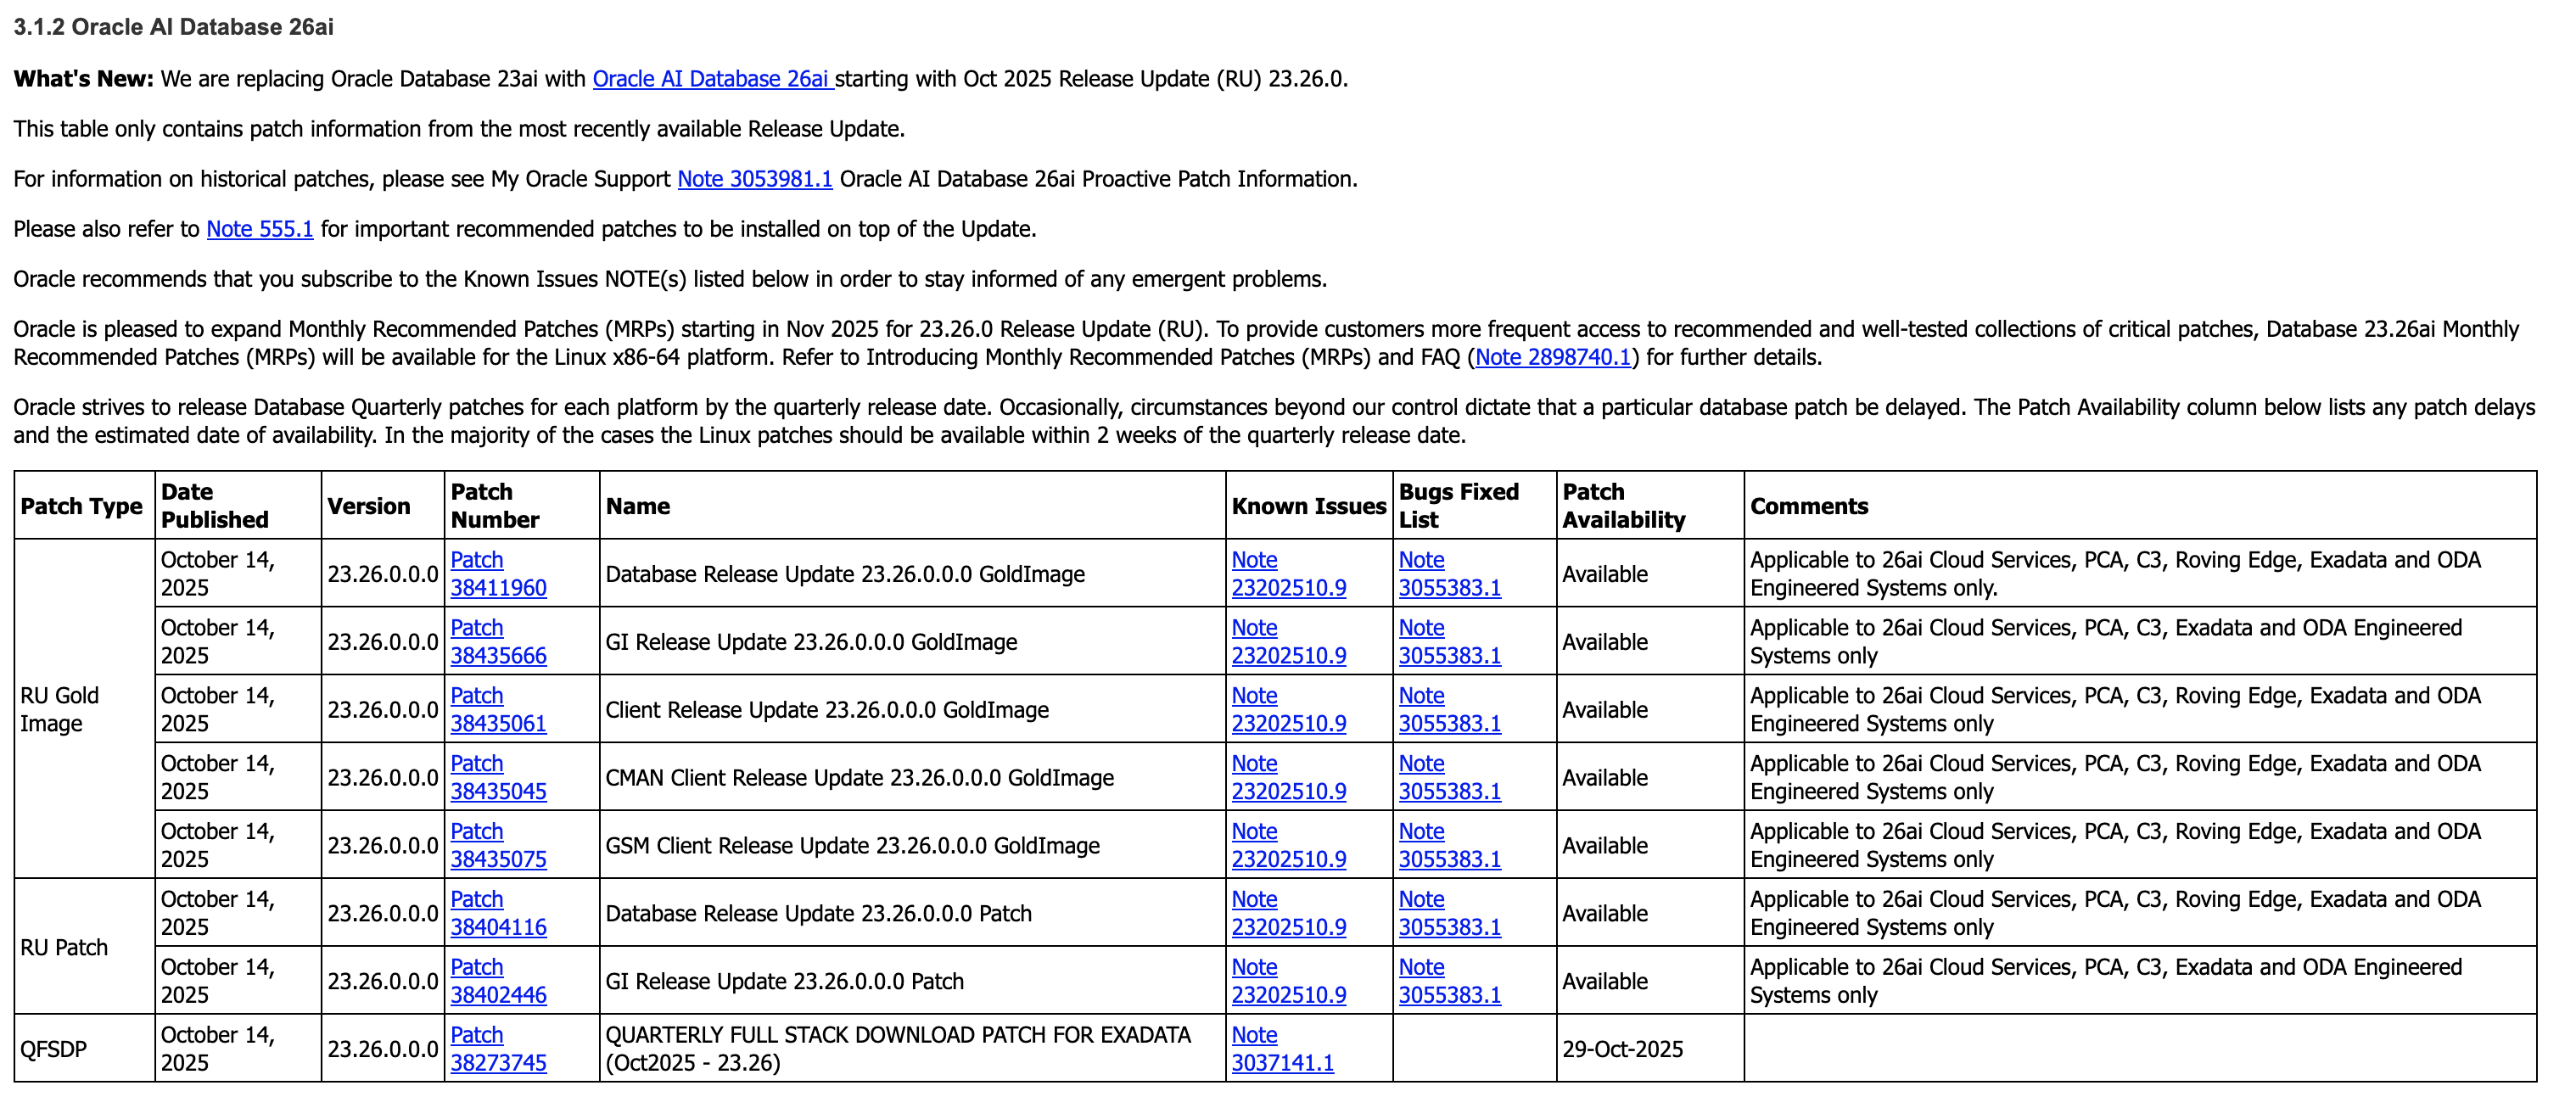
    In today’s episode of annoying things, I was looking for the latest Oracle database and grid infrastructure gold images for Exadata so I can update my databases to Oracle AI Database 26ai (more on that in another post).

    As always, I go to the following MOS notes – 888828.1, and 888.1 – to get the desired information.

    Which give me the specific patches I need to download. (888828.1 first, followed by 888.1)

    Graphic of patches from MOS note 888828.1 for Oracle AI Database 26ai on Exadata
    Graphic of patches from MOS note 8881 for Oracle AI Database 26ai

    But here’s the thing – I want the Database and GI Gold Image Clone files for Exadata so I can use them with OEDACLI to install and update my VM clusters.

    In MOS, to find these you can search for “DB SOFTWARE CLONE” or “‘GI SOFTWARE CLONE” and do some digging to find what you’re looking for.

    But the easiest option to find this information is to use OEDA itself.

    Firstly, make sure you download the latest OEDA release from https://www.oracle.com/database/technologies/oeda-downloads.html

    Then unzip it to a location of your choosing, fire up the Web UI and walk through creating a configuration, or upload and update an existing configuration, which will give you the desired information in the installation report at the end!

    Image of OEDA installation report Appendix B with the required download files and patches

    Simple right. Sure – but its actually even easier than this.

    OEDACLI has a great little feature which gives you this same information, namely the patches you need to download, in two simple commands.

    Again, after downloading the latest OEDA release, start oedacli from the command line. You don’t need to provide a configuration file.

    ./oedacli

    Then, use the ‘list requiredfiles’ command and pass in the DB or GI versions you want information about.

    oedacli> LIST REQUIREDFILES DBVERSION=23.26.0.0.0
    
    VM_DB_FILES_23.26.0.0.0 : p38455285_2326000DBRU_Linux-x86-64.zip : db-klone-Linux-x86-64-2300026000.zip
    VM_DB_KVM_FILES_23.26.0.0.0 : p38455285_2326000DBRU_Linux-x86-64.zip : db-klone-Linux-x86-64-2300026000.zip
    BM_DB_FILES_23.26.0.0.0 : V1043785-01.zip

    And

    oedacli> LIST REQUIREDFILES GIVERSION=23.26.0.0.0
    VM_GI_FILES_23.26.0.0.0 : p38455288_2326000GIRU_Linux-x86-64.zip : grid-klone-Linux-x86-64-2300026000.zip
    VM_GI_KVM_FILES_23.26.0.0.0 : p38455288_2326000GIRU_Linux-x86-64.zip : grid-klone-Linux-x86-64-2300026000.zip
    BM_GI_FILES_23.26.0.0.0 : V1043786-01.zip

    So for the DB, I want to grab patch 38455285, and for GI I want patch 38455288.

    So what was annoying me about that? My own memory! This neat feature has been around since the around 2017 (if not earlier), but somewhere along the way I forgot about it and started doing things the hard way again…

    Oh, and while we still have oedacli running, if you want to know what software versions are supported on your generation of Exadata, the LIST SOFTWAREVERSIONS command is really helpful.

    oedacli> list softwareversions where type=X8M
    GI Versions for X8M
    11.2.0.4.210119
    12.1.0.2.220719
    12.2.0.1.220118
    18.14.0.0.210420
    19.29.0.0.251021, 19.28.0.0.250715, 19.27.0.0.250415, 19.26.0.0.250121
    23.26.0.0.0, 23.9.0.25.07, 23.8.0.25.04, 23.7.0.25.01
    Recommended GI version: 23.26.0.0.0
    
    DB Versions for X8M
    11.2.0.4.210119
    12.1.0.2.220719
    12.2.0.1.220118
    18.14.0.0.210420
    19.29.0.0.251021, 19.28.0.0.250715, 19.27.0.0.250415, 19.26.0.0.250121
    23.26.0.0.0, 23.9.0.25.07, 23.8.0.25.04, 23.7.0.25.01
    Recommended DB version: 23.26.0.0.0

    Make sure you have the appropriate support in place for any versions earlier than 19c.

    And that’s it – the easiest way to get the patch numbers for the Gold Image Clones used by OEDA and Exadata to deploy and update Oracle Database and Grid Infrastructure!

  • Getting Oracle Database spfiles (and other files) in and out of Exadata Exascale

    I was recently playing with the new AI Vector Search capabilities of Database 23ai, when I did something a little daft.

    Without really thinking about what I was doing, I increased the memory allocated to vector_memory_size. “Ok” you say, “Whats wrong with that?” At face value nothing, I changed a parameter. But as I didn’t think about the any of the other memory parameters, like sga_max_size and sga_max_target, I set myself up for an inevitable problem if I restarted the database, or the VMs I was using were restarted.

    And restart the database (and the VMs) I did – or tried.

    And restart the database did not.

    Without worrying about how I messed up, lets cover how I got out of this pickle.

    First, as the title indicates, I’m working on an Exadata that has been deployed with the awesome (if I do say so myself) Exascale technology. You can check out more about Exascale on the Exadata PM blog. For now, know that at its core is a new decoupled storage management system that manages storage resources globally, as in for many database or VM clusters, rather than cluster-by-cluster. It has similarities to ASM, but introduces a ton of new capabilities including resource pooling, and very cool database instant snapshot and cloning features. More on those another time. Back to my “broken” database.

    As my database won’t start – not even in mount mode – I can’t easily update the vector_memory_size parameter. So I need to do the following:

    1. Extract the spfile from Exascale as a text file
    2. Remove or change the vector_memory_size parameter
    3. Create an spfile from the edited text file
    4. Start the database

    Exascale aside, I sure most if not all DBA’s have had to do this at some point in their careers.


    Step 1 – get the spfile!

    SQL*Plus and sqlcl make this easy. Simply fire up your chosen utility and

    SQL> create pfile='/tmp/pfile.ora' from spfile;

    That gets us our parameters out of Exascale into an easily editable text file.


    Step 2 – edit the pfile!

    Again, this is pretty simple. Start your text editor of choice, e.g. vi, emacs, nano, pico, etc, and make the required changes to the file you created in the last step.

    In my case, rather than remove or downsizing the memory allocation for vector_memory_size, I’m going to up-size my SGA.

    For the sake of comparison, this was the SGA size before I shotdown the database and realized what I’d done.

    SQL> show sga
    
    Total System Global Area 6439969072 bytes
    Fixed Size		    5439792 bytes
    Variable Size		 2030043136 bytes
    Database Buffers	 2248146944 bytes
    Redo Buffers		    8855552 bytes
    In-Memory Area		 2147483648 bytes
    Vector Memory Area	 2147483648 bytes

    Step 3 – (re)create the spfile from the edited pfile!

    Now we have a pfile, we need to re-create the spfile in Exascale so both instances in my cluster can access it.

    First, we’ll create an spfile from the pfile in SQL*Plus or sqlcl

    SQL> create spfile from pfile='/tmp/pfile.ora'

    This will create an spfile in the $ORACLE_HOME/dbs directory of the database VM you are currently on. In my case, its called $ORACLE_HOME/dbs/spfilec8db12.ora

    $ ls -al $ORACLE_HOME/dbs/spfilec8db12.ora
    -rw-r----- 1 oracle dba 8704 May 27 22:12 /u01/app/oracle/product/23.7.0.25/dbhome_1/dbs/spfilec8db12.ora

    Next, we need to backup the existing spfile. I may be a Product Manager these days, but good old DBA instincts are hard to suppress.

    First, lets get the location of our databases spfile using srvctl.

    $ srvctl config database -db C8DB1|grep -i spfile
    Spfile: @exapm13050608vault/EXAPM13050608-82B1CA80638E4F86BF2E4B3EABC7B6E7/C8DB1/PARAMETERFILE/spfile.OMF.628AA9E0

    Exascale includes a new utility called XSH – the Exascale Shell.

    XSH includes a cp command that allows us to copy files in and out of Exascale storage. ASM has a similar capability.

    Using XSH, we’ll copy our file current spfile to a safe location.

    $ xsh cp @exapm13050608vault/EXAPM13050608-82B1CA80638E4F86BF2E4B3EABC7B6E7/C8DB1/PARAMETERFILE/spfile.OMF.628AA9E0 /tmp
    
    $ ls -al spfile.OMF.628AA9E0
    -rw-rw---- 1 oracle oinstall 8704 May 27 22:15 spfile.OMF.628AA9E0

    Now we can copy our new spfile back into Exascale using XSH. Note in the command below, tell XSH that its copying in an ‘init‘ file with the --ftype attribute.

    $ xsh cp --ftype init $ORACLE_HOME/dbs/spfilec8db12.ora @exapm13050608vault/EXAPM13050608-82B1CA80638E4F86BF2E4B3EABC7B6E7/C8DB1/PARAMETERFILE/spfile.OMF.628AA9E0
    
    $ xsh ls -l @exapm13050608vault/EXAPM13050608-82B1CA80638E4F86BF2E4B3EABC7B6E7/C8DB1/PARAMETERFILE/spfile.OMF.628AA9E0
                8704             Mar 10 15:24:05 2025 @exapm13050608vault/EXAPM13050608-82B1CA80638E4F86BF2E4B3EABC7B6E7/C8DB1/PARAMETERFILE/spfile.OMF.628AA9E0

    Step 4 – restart the database!

    Finally, use srvctl to restart the database

    $ srvctl start database -db C8DB1

    Success! The database is back up and running.

    Comparing the SGA now with the earlier one, you can see I added 4 GB to the sga_max_size and sga_target being the total to 10 GB.

    SQL> show sga
    
    Total System Global Area   10736573488 bytes
    Fixed Size                     7076912 bytes
    Variable Size               2516582400 bytes
    Database Buffers            3909091328 bytes
    Redo Buffers                   8855552 bytes
    In-Memory Area              2147483648 bytes
    Vector Memory Area          2147483648 bytes

    And that’s it. You can copy spfiles in and out of Exascale. In reality, you can copy many more file types in and out – check out the XSH – the Exascale Shell command reference for all the details.

  • Autonomous Database Clones

    Autonomous Database Clones

    As of today, you can now clone Autonomous Databases – both ADW and ATP – in Oracle Cloud Infrastructure.

    This was an oft requested feature for the service and its great to see that its now available. 

    You have the choice of having a full clone or metadata only clone created.

    • Full clones are a full clone of the PDB underlying the database – users, stored procs, tables, partitions, indexes, table stats, DATA – the works…
    • Metadata clones are as they sound – all the metadata describing the database, objects, tables, users etc – BUT NO DATA.

    To create a clone, you need a previously created ADW or ATP:

    Heres some I prepared earlier

    Next – hover over the ellipsis (three dots) on the right hand side and select “Create Clone”

    Create Clone

    You’ll then be presented with a familiar dialog box to choose the amount of CPU, Storage the database needs, what the new ADMIN password for the clone will be and what your choice in license (Included or Bring Your Own).

    You can also choose the compartment the clone will be created in.

    Most importantly, you get the choice (right up top) of the kind of clone you want – FULL CLONE or METADATA CLONE

    Full or not full, that is the question

    Once you’ve made you choices, click “Create Autonomous Database Clone” and the platform will go ahead and clone your ADW or ATP just as it would were it provisioning a new Autonomous Database.

    When its done, it’ll act and behave just like the source Autonomous Database it was cloned from. You can scale up/down CPU and storage or stop the CPUs all together.

    Bear in mind the clone is not linked to the source database .. Any changes you make to the source database stay in the source database.

    And there you have it – Autonomous Database Clones!

    For more information, check the following doco pages:

    Autonomous Database New Features – Check March 2019

    Clone Autonomous Database

  • Oracle 18c != Autonomous Database, But Autonomous needs 18c

    When Oracle (yes, I work for the big O) announced that it was building out its Autonomous Database Platform – starting with the Autonomous Data Warehouse Cloud (ADWC) – I started hearing a lot of statements that Oracle 18c would be Autonomous in and of itself. This is not the case.

    The very excellent Tim Hall “ranted” (not really) about this late last year after he got an early view of the Autonomous platform at OOW17. Read his view here -> Tim Hall – Oracle Autonomous Database and the Death of the DBA.

    So what is 18c? Its the latest version of the Oracle Database – also known as 12.2.0.2. That is its the 12.2 database with what Oracle used to call a patchset. As of 18c, Oracle has moved a “yearly” release cycle with quarterly release updates and release update revisions in between. I’ll write more on this another time.

    As with releases of Oracle Database over the past 20-25 years (remember that 9i was the “Self Managing , 18c includes, adds and/or enhances a vast array of features that are designed to reduce the amount of time DBAs need to design and build the database and server infrastructure, keep the database up and running, make it perform, and keep it patched and upgraded. Features in this category include Automatic Storage Management, SQL Tuning Sets, SQL Plan Management, Automatic Memory Management, Automatic Data Optimisation and and and…

    The issue with the above is that you had to choose to use almost all of them. Yes, part of the “choice” was that you had to choose to buy the license, such as Advanced Compression to get access to Automatic Data Optimisation, but putting that aside for a minute, you had to choose to use whatever feature might help you in a given situation.

    Oracle Autonomous Database effectively takes the need to choose away from the user, by turning on all the automated features that Oracle have been building into Oracle Database, in favour of providing a standardised database platform that tunes, upgrades, patches and secures itself in an ongoing manner. Add into the mix an autonomous management engine to keep everything on track.

    Oracle has stated that the Autonomous Database services will be available in Oracle Cloud and, over time, on the Cloud @ Customer platforms. 18c Database is the underlying database version for Autonomous.

    18c will, as have past releases, be available for DBAs, devs and anyone else who is interested, to download and install on their own infrastructure. But the parts that make an Autonomous service will be cloud only offerings.

    As Tim put it so succinctly,

    Less time on boring shit. More time on important shit!

    Hear, hear!! Stop doing the stuff you did as a junior DBA, and get stuck into the interesting stuff. Help devs write better SQL, learn features and tools you haven’t needed or didn’t have licenses to use in the past – features like Spatial & Graph, R, Database In-Memory – and apply what you discover to the problems in the context of your business and its unique needs.

    BUT, this doesn’t mean that knowing how to build a database, when to choose to use a feature and when not to is not also still important. You can’t abdicate your responsibility as a consumer to ensure that you are using the right service for the right purpose at the right time. You’ll just have to do less of the grunt work over time.

    In my view, Autonomous Databases are the next evolution of data management platforms and a welcome one. The less process work that needs to be done manually the better. Let’s get back to the interesting shit!